- Making foxtails and burrs a less prickly problem
- Handling really messy problems
- Removing sticky stuff from your dog’s coat
- Stopping the stink — the definitive answer to skunk spray
Dogs get into some of the darnedest things. Stickers, burrs, foxtails, tar, and other substances are fairly typical of the stuff that gets caught in dog fur. Even if your dog spends most of his time indoors, he can get into the craziest things around the house, like bubble gum and oil, but don’t panic when your dog looks like he rolled in — eww! — What did he roll in? Whatever it is, you have to deal with it.
Tip
The first step to combating the ick that your dog inevitably brings home in his fur coat is to keep on hand a few select items that I like to call my Anti-Stick/Stink Kit:
|
|
Taking a Walk on the Prickly Side
Getting rid of burrs and stickers
Burrs and stickers are most painful here and can cause your dog to limp. Pick up and inspect each foot and run your fingers between the webbing on the paw pads to feel for anything prickly.
If you find something prickly, look at it. If it’s a burr or prickly foreign matter, use tweezers or forceps to remove it. If it seems to be part of your dog, take your dog to the vet to have it examined.
If you find one, try separating it from the fur with a medium- or fine-toothed comb.
Tip
Sometimes rubbing a little cornstarch through the fur helps smooth out the prickles and loosens the hair. If you use cornstarch, you have to rub it into each of the burrs and then work them out with your fingers.
Remove burrs from sensitive areas gently with your fingers. Use a comb and cornstarch to work any burrs loose from the chest and belly.
Burrs with minds of their own somehow love to hide in the fluff behind the ears and inside the ears. Use your fingers to remove burrs from these sensitive areas. Don’t use cornstarch in the ears because you may leave behind a residue.
Remove them with cornstarch and your fingers or a comb.
Tip
After you get the burrs out, consider bathing your dog because of the greater risk that he’s picked up external parasites running around in all that brush. Follow up the bath with a good systemic flea and tick treatment if your dog isn’t already using one (see Chapter Grooming Emergencies: Knowing Doggie First Aid).
Warning!
No matter how tempted you may be, never bathe a dog with burrs and stickers in his coat. If you don’t get them out beforehand, they’ll cause mats that are even harder to remove after a bath. And never get cornstarch in your dog’s eyes; it can be a real irritant.
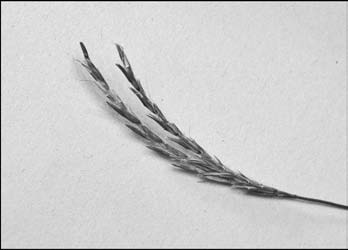
Dealing with grass awns (foxtails)
Warning!
Left alone, foxtails can cause severe damage to a dog’s body. They burrow into a dog’s coat with every movement. They’ve also been known to get inside paws, noses, eyes, and even internal organs. Because they’re a foreign body, they eventually cause abscesses and require your veterinarian to remove them surgically. I’ve heard of dogs that have lost their eyesight or had to have surgery to remove foxtails from their nasal cavities.
Remove the stuff that you can easily see.
Make sure you check paw pads, between toes, and in fur feathering.
If foxtails burrow into these areas, you can run into many problems. For extra safety, look around the flews (lips) and gums to make sure your dog hasn’t gotten any in his mouth.
If you find an embedded foxtail that can be easily removed with a forceps or tweezers, by all means, remove it. If, however, the foxtail is severely embedded and you’d risk leaving part of it under the skin when you try to remove it, seek veterinary attention to have the awn removed.
Warning!
Watch for signs of infection — redness, swelling — around areas you know were affected. If your dog shows any hint of infection, seek veterinary attention immediately.
Shedding the Slick and Sticky Stuff
Warning!
Never use scissors to cut any of these substances from your dog’s fur coat, because you risk cutting his skin and a bloody trip to the emergency vet for sutures. Furthermore, never use the electric clippers while your dog is in the wash tub. You and your dog risk electrocution.
Oil slick (petroleum-based chemicals)
Tip
For almost all types of oils, an emulsifying, hand dishwashing soap like Dawn is your best bet. Environmentalists who clean up oil-covered birds and other marine wildlife use Dawn to break down and get rid of the oil. Besides, it’s an extremely safe soap, provided you don’t get any in your dog’s eyes.
Be sure to work the soapy solution all the way to her skin.
You may need to drain the tub and rinse well a second time to make sure that the soap residue is removed.
While lathering and rinsing, be careful around your dog’s eyes. You don’t want to get any soap or chemicals in them.
Why can’t I use scissors? (Or lessons learned the hard way)Throughout Dog Grooming For Dummies, I repeatedly warn you about not using scissors on your dog’s fur coat, and you may be wondering why. Many well-meaning pet owners accidentally cut their dog’s skin while trying to get a foreign substance out of the coat, and they then have to rush the pooch to the emergency room for sutures. Even I’ve had an accident with scissors, which proves that even the pros screw up. No matter how careful and well-meaning you are, if your dog is struggling or you get in a hurry (or even if you don’t), you can really botch a good grooming session with one accident. I’ve asked vets about scissors, and almost all of them agree that using scissors on a dog’s coat is a common problem. Well-meaning owners with scissors should stay far away from their dogs. Use electric clippers instead, or have a professional groomer handle the situation. |
Tar babies
Warning!
Never ever use solvents or chemicals to remove the tar. They can be caustic and burn your dog.
– Soak the affected areas in a mixture of warm water and emulsifying dish soap for 10 minutes to find out whether the soap will loosen the substance. Then use a medium-toothed comb to remove the tar if you can.
– Blot the area dry first. Then keep the substance warm with a warm, wet dishrag, or use the body heat from your fingers while working vegetable oil into the tarry substance. This method sometimes enables you to remove the tar.
Gummy pups
The oil should help break down the sticky properties of the gum so you can remove it carefully with your fingers.
When the gummy area is widespread, you may need to seek the help of a veterinarian or professional groomer.
Glue
– Water-based glue: If the glue is water-based, use warm, soapy water (with a dishwashing soap like Dawn) to clean the area, and then follow up with a bath (see Chapter Caring for Your Canine’s Teeth, Toes, Ears, Face, and Ahem, Other Areas).
– Contact cement: If the glue is a type of contact cement, read the label to determine the best way to remove it and follow the directions. If the directions require some pretty hazardous chemicals, seek professional advice from a veterinarian or poison-control hotline.
Corn syrup and sugary problems
Be sure to work it in all the way to her skin.
If you find hardened lumps of sugar, dissolve them and work them loose with warm water and soap by rubbing them between your fingers.
Surviving Stinky Skunk Odor
The worst thing that a dog can get into is skunk odor. I’ve never known anything as unpleasant or as stinky as a dog who’s been skunked. Skunks seem to find dogs even when the dogs aren’t looking for them. One time, my dog was in my own fenced-in backyard and was sprayed through the fence when a skunk took a disliking to him.
Smelling a skunk is all in your mind: Yeah, right!Why do people think that some skunk remedies work when they really don’t? The truth is, at some point, your olfactory senses just get overloaded with the smell and seem to shut down. Basically, you get used to the smell, and after a bit, it may not smell as bad as it really is. The bad news: The smell still exists despite your body’s best attempts to deal with it. |
Technical Stuff
A skunk’s spray is made up of a number of stinky compounds called thiols. Thiols are the same things that make decomposing flesh and dog poop stink, but the ones in skunk spray aren’t quite the same. Skunks usually produce about two tablespoons of the spray — enough for six quick shots. When a skunk actually dumps all of it, the animal needs a week to two weeks to recharge. All this is small consolation when your dog gets skunked.
– Tomato juice: An old standby, tomato juice does darn near nothing. It may cut through the oils in the thiols, but you still end up with a stinky dog — and a pinkish colored one at that.
– Vinegar and water douche: Here’s another home remedy that really doesn’t do much. Yes, it may mask the thiols a bit, but it doesn’t do much else.
– Professional odor removers: These substances work okay on a variety of levels, but you’ll still know that your dog has been skunked.
- One pint hydrogen peroxide
- 1⁄8 cup baking soda
- 1 teaspoon hand dishwashing soap
Be sure to cover every inch of his body, all the way to the skin.
Don’t get any of the solution in his eyes.
You can’t make the deskunking solution ahead of time and store it for future use. The gases aren’t poisonous, but they can build up and cause an explosion if contained.
Dealing with Downright Dangerous Chemical Poisons
Remember
When something gets on your dog’s coat, the natural reaction is for your dog to lick off the offending substance. The problem with your dog’s reaction is that the offending substance can become even worse after it’s swallowed. For that reason, you should always have the number to a poison-control hotline on speed dial or posted close to your phone. If possible, have the substance your dog has ingested on hand, and try to be able to readily identify it.
National Animal Poison Control Center hotlineThe American Society for the Prevention of Cruelty to Animals (ASPCA) has a nationwide Animal Poison Control Center hotline set up exclusively for pets. The number is 1-888-426-4435. The center has veterinary toxicologists available 24 hours a day, 365 days a year. A $50 consultation fee may apply per incident, but that fee covers as many calls about the same incident as are necessary. You can find out more about the ASPCA/APCC hotline by visiting its Web site at www.apcc.aspca.org. |
If possible, try to provide your name, address, and phone number; the name of the poison, amount, and time since exposure; your dog’s symptoms; and your dog’s age, sex, breed, and weight.
- If you know what the poison is and have the label available, read the precautions and find out whether an antidote is recommended; then follow the instructions for safe removal.
Warning!
Although many chemicals require you to flush the skin with water and then follow up with a mild soap-and-water bath, some poisons don’t react well when combined with water, so don’t use water unless you’re sure the chemical won’t react with it.
- If you don’t know what the poison is, remove as much of it as you can from your dog while wearing rubber gloves.
This step is important, especially when your dog has accidentally ingested something.
by Margaret H.Bonham

