- Drilling your dog on essential grooming manners
- Helping your dog accept being touched in sensitive areas such as paws and face
- Establishing a grooming routine
- Handling troublesome dogs
So you dread the idea of grooming your dog. All dog owners, at one time or another, have had a dog they just couldn’t groom. Perhaps a dog’s bad experience being brushed or combed was to blame, or maybe you cut a toenail too short (Ouch!) and your dog bled and now won’t let you near him, or maybe your dog just doesn’t like the bath. Whatever the reason, you’re facing a dog who doesn’t like to be groomed.
The truth is you still can have a dog who at least tolerates grooming. The trick is to train your dog to get him used to what you normally do when grooming him, such as putting him on the table or gently handling his mouth or feet. In this chapter, I give you great pointers on how to show your dog that the basics of grooming are not such a bad experience after all.
Refining Your Dog’s Grooming Manners
Good grooming manners don’t happen overnight. Familiarizing your dog with procedures is essential in anything you’re trying to get your dog to do. Dogs need to be trained in good grooming manners so they get used to the idea of being cleaned and preened — they may even come to enjoy it! After all, grooming is attention and time spent with you.
Unfortunately, most dogs are introduced to grooming at the worst possible time, when they’re either dirty, have mats in their hair, they need their toenails clipped, or all of the above. They struggle (Who wouldn’t?) because they don’t like being held or having their feet touched or their fur pulled. Remember when you were a kid and had a mat (or bubblegum) in your hair?
You know how unpleasant that is. I used to hate to have my mom comb my hair, because I always had so many tangles. Your dog feels the same way.
The best way to instill good grooming manners in your dog is to make the experience a pleasant one. Otherwise, your dog simply won’t participate or will do so only grudgingly.
The best time to train a dog to accept any kind of grooming procedure is when he’s a puppy. Puppies are more open to new things, and you have time to build up good experiences from this openness. When your dog hasn’t had any bad experiences with grooming, he’s more likely to be accepting of the procedures.
But even if you have a dog who has endured bad experiences with grooming, you still can retrain him to accept it. Your dog just needs more time and more training.
Tip
Try spending about five to ten minutes a day training your dog to deal with grooming issues. Keep your sessions short and fun and always end them with a quick game of fetch or another activity that your dog enjoys.
Using positive reinforcement to train your dog
A great training method known as positive reinforcement works well with dogs in most situations. When using this method, you reward the dog’s behavior that you want to see and ignore — don’t acknowledge — what you don’t wantto see. For example, every time your dog hops onto the grooming table, give her a treat or high praise — “Good dog!” When your dog doesn’t get on the table, don’t give her any rewards or attention — but don’t punish her, either. The trick is providing a good enough reward that your dog actually wants to get on the table each time.
Most dogs are food driven, so food is used in most positive reinforcement training, because it’s easy to hand out and most dogs do what you want to do for the right kinds of treats. You may have to experiment a bit with your dog, especially if one treat isn’t going to do it for her. You may have to think outside the box and go with human food. I haven’t yet found a dog who would pass up cooked steak, liver, or chicken. I’m sure they’re out there, though. On the other hand, keeping a handful of your dog’s regular kibble close at hand can be just what the vet ordered.
Tip
When handing out treats, make sure they’re small enough so you can reward your dog with a bunch of them. Unless your dog is ultrathin, doling out medium to large treats is likely to make for a very fat dog in no time. Try splitting treats into thirds or buying treats made in tiny-sized portions.
Some dogs simply are not food driven. If yours truly isn’t, try finding a toy that she’s ecstatic about or a brief activity she really enjoys, and use that as your treat.
Showing your dog how to enjoy grooming procedures
If humans have one fault when it comes to their canine friends, it’s that they can be a little impatient. Yes, dog owners have it all figured out, and somehow (perhaps by osmosis or by rote) they think their dogs have figured it out, too. What dog owners forget is that dogs sometimes find humans just as perplexing as humans sometimes find dogs. The problem: What translates well to humans doesn’t translate at all to dogs, and that applies to grooming.
When you begin a grooming session, your dog probably won’t understand that it’s ultimately for his benefit — even if you try to explain it to him. He is, after all, a dog, and dogs don’t come with the knowledge of combs, brushes, shampoo, and nail clippers.
Because you can’t simply sit your dog on the couch and rationally explain grooming to him, you pretty much have to leave him in the dark about why it has to be done. You can, however, make your dog comfortable with tools and procedures simply by minimizing the scary and painful sides of grooming as much as possible and giving rewards and praise for behaving in the right way.
You go about this task by desensitizing your dog to smaller grooming issues that won’t bother him as much by doing the following:
– Choosing a time when your dog is a little tired and maybe a little hungry. You want your dog to be willing to stand still for a while and to accept food from you when you want to initiate a grooming procedure, such as brushing or toenail trimming. However, you don’t want your dog so tired that he’s falling asleep.
– Finding a quiet place around your house where you can spend some time alone with your dog. The room in which you plan to groom your dog needs to be in an out-of-the-way area where neither you nor your dog is distracted.
– Petting your dog gently all over his body. Observe his reactions as you touch his legs, the sides of his body, his face, his tail, and his rear end.
– Giving your dog small treats as you’re petting him. These morsels provide a distraction for your dog when you’re touching him in areas he otherwise may find worrisome or uncomfortable.
If your dog shows signs of sensitivity or nervousness when you touch a particular area, don’t push it. You may be tempted to insist on touching the spot your dog’s reacting to harder, but don’t. Lighten up on the pressure to find out whether the nervousness continues or abates. If it continues, move to another section of the body that he’s more comfortable with you touching. As your dog relaxes, you can try to go back to the sensitive area with a gentler approach.
– Keeping the petting sessions short — maybe one to two minutes, tops. The length of these initial sessions isn’t as important as the frequency. Intersperse them frequently throughout the day.
Gradually increase the length of the petting sessions as your dog relaxes and begins to enjoy them. You can also move the petting sessions into your grooming area, if you haven’t done so already.
– Getting your dog used to grooming objects, such as by running a brush or comb through his fur and against his skin. Start with a soft slicker brush (see Chapter Training Your Dog for Grooming), substituting it for your hand and repeating the petting routines described earlier in this list.
Tip
If your dog is fearful of grooming procedures, you need to make the petting and brushing sessions extremely short at first. Use treats to coax your dog’s attention away from the slicker brush so that he focuses instead on the food you’re giving him and the pleasant sensation.
Warning!
Whatever you do, don’t push the sessions any longer than your dog can stand. If your dog reacts adversely to them, start out by holding a treat and letting him nibble at it. While he’s distracted (tricky, eh?), slowly and gently use the slicker brush, praise him when he’s reacts positively, and then stop. Work up to longer brushing sessions slowly.
Handling sensitive puppy feet
Dogs hate having their feet handled — possibly because they’re ticklish but more likely because it just doesn’t feel right to them. The fact is if you’re going to groom your dog, at some point your dog must get used to having you hold her feet.
Being able to hold your dog’s feet when grooming is essential. You need to hold them when you’re:
– Clipping your dog’s toenails or trimming the fur between her paw pads
– Checking your dog’s feet for foreign bodies such as burrs, foxtails, thorns, and other stickers that can cause her to limp
– Examining your dog for other injuries You can help your dog acclimate to having her legs and feet touched in much the same way you work with her to accept grooming procedures (see previous section). After choosing a time when your dog’s a little tired and maybe a little hungry and finding a quiet place where you can spend a little time together (your grooming place is a great spot), try the following:
1. Pick up and then set down your dog’s paws one at a time.
Observe her reactions as you pick up her feet. Don’t hold them for any length of time — just a quick pickup, look-see, and then put them down.
If she reacts negatively, try distracting her with a bit of food as you pick up the paws.
2. Repeat the paw pick-up and put-down process several times a day.
Don’t lengthen the sessions until your dog becomes comfortable with the procedure.
3. Gradually lengthen the amount of time you’re holding the paw when you pick it up.
Increase your holding time by a second or two until your dog is comfortable with you separately picking up all four feet. Distract her with food whenever necessary.
If your dog shows any sensitivity or nervousness, don’t push the process. Although you may be tempted, don’t hang onto your dog’s foot any longer, or hold it tighter, than your dog will allow. Reduce or increase the amount of time spent on this step according to whether your dog’s nervousness continues or abates. If it continues, go back to Step 1 and work from there.
4. Try a light one- or two-second massage as your dog becomes more comfortable with having her feet held.
Rub each toe individually rather than just holding the foot. The sensation may be new to your dog and a little scary, so be brief.
5. Gradually increase the amount of time you spend massaging your dog’s paws.
Your dog soon finds out that it’s easy to relax and enjoy the massages Be sure to move these sessions into your grooming area, if you haven’t already done so.
Eventually your dog grows accustomed to having her feet handled. When you start clipping her toenails, try clipping the nails on only one paw at a time so you don’t have to hold her in one place for so long. Just trim the tips; don’t try to cut a lot off at this time. See Chapter
Giving Your Dog a Great ’Do: Clipping Basics for more information about trimming toenails.
Manipulating your dog’s mouth
Most dog owners never really have to handle a dog’s mouth unless they need to give their dogs a pill — and then, watch out! As a dog owner, you soon learn that handling your pup’s mouth can be a real struggle, and those pointy teeth can hurt like heck when you’re on the receiving end.
The truth is that dog owners need to handle their dogs’ mouths all along for good grooming reasons, such as:
– Brushing your dog’s teeth
– Looking for foreign objects in your dog’s mouth
– Giving your dog pills and liquid medication
– Checking your dog for health problems such as shock (gray gums) and dehydration (sticky gums)
The problem with your dog objecting to having his mouth handled is that he may consider letting you know his position in no uncertain terms — yes, ouch, big time — especially when his teeth are so close to you. You must be extremely careful when working around your dog’s head, because snapping when frightened or in pain is an instinctive reaction for your dog. Go slowly and deliberately, and watch for signs of possible fear or even aggression when working with your dog’s mouth.
Again, you can show your dog how to accept being touched on the mouth using a method similar to the way you persuade him to accept grooming procedures (see the previous section). Remember, slow and easy does the trick. After choosing a time when your dog’s a little tired and maybe a little hungry and finding a quiet place where you can spend a little time together (your grooming place is a great spot), try the following:
1. Touch the sides of your dog’s mouth.
Observe his reactions as you’re touching his mouth. Use light pressure — nothing major — and then give him a treat and as you touch his mouth, letting him work on the treat in your hand so that your fingers are touching his gums.
Repeat this procedure a few times a session, several sessions a day, to get your dog used to it. If your dog reacts negatively, try distracting him with a bit of food as you touch his mouth.
2. When your dog is comfortable with you touching his mouth, try pushing or flipping up his flews (upper gums) and letting them drop along each side of his mouth.
Don’t lengthen the sessions until he becomes more comfortable with this procedure.
Lengthen the flew-flip time by a second or two after your dog grows comfortable with that form of touching. Distract him with food if necessary.
3. When your dog is accustomed to having his flews flipped up, you can lightly rub his gums with your fingers and a soft treat.
In place of the soft treat, you can try using a bit of doggie toothpaste that’s flavored with chicken or malt.
Don’t force the issue if your dog shows any sensitivity or nervousness. Although you may be tempted to push on, don’t. Instead, reduce the time spent rubbing his gums to find out whether the nervousness continues or abates. If it continues, go back to Step 1 and work from there.
4. When your dog is more comfortable having his teeth and gums touched, try a light one- or two-second gum massage.
Rub the gum lightly rather than just touching it. This sensation may be a new one for your dog, and it may be a little scary, so be brief.
5. Gradually increase the length of the massage sessions as your dog relaxes and starts to enjoy them.
Move them into your grooming area, if you haven’t already done so.
As your dog relaxes and enjoys the attention, be sure to get him used to opening his mouth and having all his teeth and gums touched. Go slowly and gently — don’t force.
Convincing your dog to accept eye contact
One mistake that dog owners sometimes make is not making proper eye contact with their dogs and then all of a sudden expecting the dog to accept eye contact. If your dog is uncomfortable with making eye contact, it may be because dogs sometimes consider eye contact as an aggressive, challenging, or domineering behavior.
However, when you’re grooming your dog, you can’t always avoid your dog’s gaze, so you need to train your dog to accept eye contact as something pleasing and not challenging. You may see your dog avert her eyes when you look into them, but don’t fret — she’s only saying, “I know you’re boss.”
Training your dog to respond to the Watch-me cue can help you make better eye contact with your dog. Starting with a handful of treats and working with your dog when she’s just a little tired and a little hungry, follow these steps:
1. Get your dog’s full attention by showing her one of the treats.
Hold a treat up to the bridge of your nose. Your dog should follow the treat with her eyes.
2. When your dog makes eye contact, offer her praise and drop the treat so she can catch it.
Repeat this step several times to reinforce the pleasurable aspect of making eye contact.
Practice Steps 1 and 2 several times a day.
3. Pair the action in Steps 1 and 2 with a cue, such as “Watch me!”
Say, “Watch me!” show your dog the treat, and then give it to her when she makes eye contact.
The Watch-me cue is useful whenever you want to get your dog’s attention.
Getting Your Dog to Help You Reach the Right Places
Grooming goes much more easily when your dog is willing to help you. Your dog doesn’t necessarily have to compete in dog shows or attend obedience-training classes to know a few key cues that can make your job of grooming him that much easier.
Your dog needs to know how to
- Get onto and off of the grooming table
- Sit on command
- Lie down on one side or the other
Showing your dog how to do these things takes a certain amount of patience on your part and his. After he catches on, grooming will go much more quickly.
Helping your dog onto the grooming table
Getting your dog up on the grooming table is an important part of grooming. After all, you can’t use the grooming table to groom your dog if you can’t get your dog on it.
If you have a small- to medium-sized dog, picking her up and putting her on the grooming table isn’t such a big chore. But if you have a large- or supersized pooch, you’re likely to schedule visits to your chiropractor after grooming sessions if you use that approach.
The two ways to coax your dog onto the table without hurting your back require training and may depend on whether your dog is capable. You can show your dog how to jump up on the table or provide accommodations that enable your dog to climb up on the table. Either way, after you show your dog how to get up on the table, you still need to make her stay there.
If your dog is arthritic, young, or just not athletic, a ramp or steps can be a handy solution. Several different kinds of steps and ramps are available.
Although most dogs love to hop onto the grooming table because they think they’re getting away with climbing on the furniture, a few may be apprehensive. If you’re trying to convince your dog to hop up onto the table and she just won’t do it — even for the yummiest of treats — try using:
– A lower table. A shorter table, such as an old coffee table or other sturdy piece of furniture, can make hopping up easier for your dog. You then try working up to higher surfaces. Four cinder blocks and a heavy board or piece of plywood or adjustable agility equipment also work. After a little practice at lower heights, you can try the grooming table again.
– A different surface. Look at the surface of your grooming table. If it’s slick, try putting a piece of rubber-backed carpet on it. The carpet won’t slide, and neither will your dog when she jumps on it.
– A sturdier grooming table. Dogs hate wobbly things, and if your grooming table wobbles in any way, fix it or get a sturdier one. You don’t want the table to wobble or (worse yet!) collapse while you’re working on your dog.
Warning!
Never force a puppy or an injured, old, arthritic, or small dog to jump onto the table. Doing so can cause the dog serious injury.
Regardless of whether your dog is capable of jumping onto the table or whether stature, age, or infirmity prohibit her from doing so, you can find a way to train your dog to get up on the table and stay there. All you need to do is choose a time when your dog is more attentive and maybe a little hungry, have plenty of treats on hand, and follow these steps:
1. Bring your dog to the table.
Let her sniff it and become comfortable with it.
2. Show your dog a treat and say “Table.”
Use the treat to lure her up onto the table or the ramp or steps, depending on which method you’re using.
You may not get her full compliance, but that’s okay. Reward your dog for any positive behavior toward getting onto the table, such as putting her front feet on the table or moving to the next step or farther up the ramp.
3. When your dog hops up or climbs onto the table, give her a treat and plenty of praise.
4. Lengthen the time your dog is on the table by telling her to “Stay” and holding her there with a treat.
Start with only a few seconds and then gradually increase the time.
5. Release your dog with the word “Okay,” which means she can jump off (or walk back down the ramp or steps).
Warning!
Some dogs can injure themselves jumping off a table, even one as low as a grooming table. If you can, support the dog or carry her off so she doesn’t get hurt.
Teaching Sit
The Sit cue should be one of the first cues your dog learns. If she hasn’t learned it yet, teach it to her now. Sit is important because it gives you basic control over your dog. When your dog’s moving around and not staying in one place, the Sit cue helps you regain that kind of control. What could be easier than showing your dog how to sit in one place?
When you start showing your dog the Sit cue, choose a quiet place with few distractions and show her while she’s on the floor or the ground. Be sure to have some treats ready, and place your dog on a leash so you can keep her with you. To show your dog the Sit command, follow these steps:
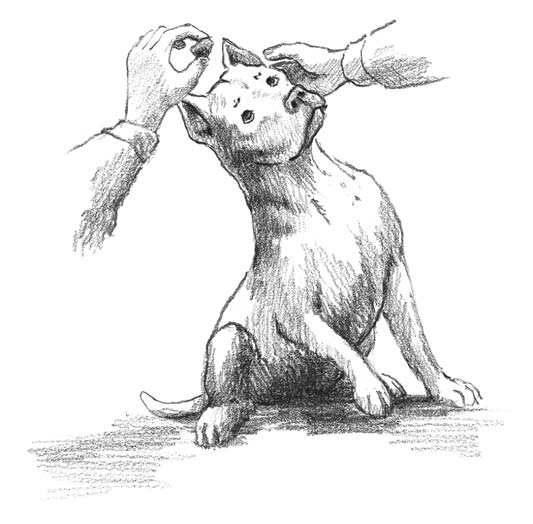
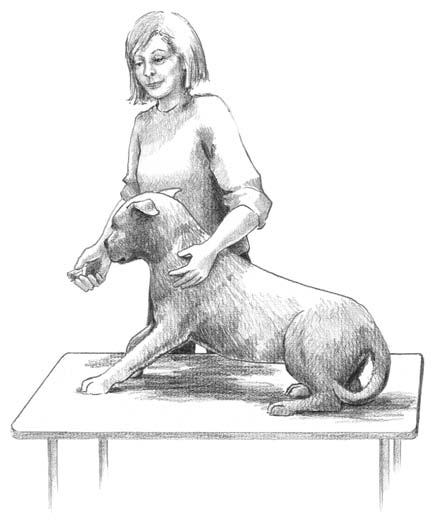
1. Hold a treat above your dog’s nose and slowly move it toward your dog so that she follows it (see Figure 4-1).
2. As your dog follows the treat, put your opposite hand on your dog’s rear end and gently apply downward pressure on the hindquarters.
3. As your dog starts to sit, give her the command to “Sit.”
4. When your dog sits, give her the treat.
If your dog resists this method, try having her stand with a wall behind her. That way, as you move the treat back towards her, she has no place to go and will sit.
Figure 4-1: Move the treat back toward your dog as you give the Sit cue.
Practice the Sit cue frequently to reinforce it. Get your dog completely comfortable with sitting before trying Sit in other areas such as on top of the grooming table.
Teaching your dog to lie on his side
One of the most useful cues for grooming your dog is a variant of the Down cue. At some point, you have to show your dog how to lie on his side so you can brush his sides and belly and work on his legs and paws. Show your dog the Down cue first, and then introduce the Side cue. Again, you need treats, a quiet place, and your dog on leash. Work at ground level before moving your training session up onto the grooming table. Your dog also needs to know the Sit cue before you start this exercise. Here’s how you show your dog the Down cue:
1. Put your dog in the Sit position (see the preceding section).
2. Show your dog a treat, and move it from in front of his nose downward to his chest while having him stay in the Sit position.
Your dog should follow the movement downward.
3. Give your dog the cue “Down” as he moves into the down position (see Figure 4-2).
4. When your dog’s elbows touch the floor, give him the treat.
Practice Steps 1 through 4 several times so your dog becomes comfortable with it.
Figure 4-2: Teach your dog the Down cue so it’s easier for him to lie on his side.
Next, you need to get your dog to lie down on his side, so follow these steps:
1. Put your dog in the Down position.
2. Show your dog a treat and move it sideways in an arc so that as your dog follows it, he puts the side of his head on the ground.
If your dog is stubborn and won’t put his head down, try putting your hand along the opposite side of his head as you focus his attention on the treat (see Figure 4-3). Then, as you move the treat, move your hand, palm downward, so that your dog assumes there’s no place to go on the other side.
3. Issue your dog the “Side” cue as he starts rolling over onto his side.
4. Practice the Down and Side cues together and often.
Show your dog how to follow the Side cue on both sides so that he understands it can mean either one.
Figure 4-3: Place your hand on the side of your dog’s head as you gently help him lie on his side.
Teaching her Stay
One cue that’s useful for grooming your dog is the Stay. When your dog is on the table, you probably want her to stay there for at least a few seconds. To get her to stay, try the following steps:
1. With your dog on the table, preferably in a sitting or down position (see the preceding sections), tell her to “Stay.”
2. As you vocalize the Stay command, hold your hand out in a stop or halt position, with palm flat and fingers extended upward.
Make a pushing motion toward your dog’s nose for emphasis.
3. Wait for a few seconds, and if your dog stays, reward her.
If she breaks her Stay, put her back in position without a treat and repeat Steps 1 through 3.
4. Release your dog from the Stay command by saying “Okay” and giving her a treat.
“Okay” means she doesn’t have to hold the Stay any longer. If she doesn’t figure that out, make a happy fuss over her — she’ll get it.
5. After your dog is successful at holding a Stay for a few seconds, gradually lengthen the amount of time.
If at any time she doesn’t stay, go back to the previous shorter amount of time and try again.
Establishing a Grooming Routine
Do you feel like you’re in a rut? Many people talk about being in a routine as a bad thing. Well, unlike humans, dogs don’t see the situation that way. Routines make your dog feel comfortable and secure. An established routine gives your dog comfort in knowing that things are reliable at home.
You can make your dog happy by establishing a solid routine in his life that includes everything from feeding, training, and grooming to playing with and walking him. Sound boring? It isn’t, really. When dogs have a routine, they know what to expect and often get ready for it before you do. For example, when you walk your dog first thing in the morning, I guarantee that by the third day, he’s waking you up to go for that walk.
Plan your grooming sessions to become part of your dog’s daily, twice-weekly, or even weekly routines. When you can make grooming sessions pleasant and routine, your dog will help you by anticipating the brushing or clipping session — just like the morning walk.
Remember
The ideal grooming calendar depends on how much work your dog routinely needs. You need to set it up and stick with it to find out whether it works for you and your dog. As a general rule, your grooming schedule may devote:
- Two days a week to brushing your dog’s coat
- One day a week to brushing your dog’s teeth
- One day a week to trimming toenails and inspecting teeth
Dealing with Difficult Dogs
If you’re lucky and you’ve worked with your dog for some time, you don’t have to worry about working with an uncooperative dog. Nevertheless, at some point, you may find yourself trying to groom a difficult dog. Maybe your best friend has a dog who’s never been properly groomed before and needs help. Maybe you found a mutt on the street who has matted and dirty fur. Maybe a rescue group is having a dog-wash day and you’re there to help. Or maybe she’s your own dog, and you’re just having problems with her. Whatever the reason, you’re dealing with a difficult dog.
Handling an uncooperative dog
Before I explain how to handle a difficult dog, you first need to know how to handle any dog, because dogs don’t react to things the way you and I do, and sometimes they do things that humans don’t always expect.
Tip
When faced with a difficult dog, whether it’s yours or someone else’s, having this dog checked out by a veterinarian for possible underlying causes is always a good idea. Dogs who suffer from arthritis or hip dysplasia may snap when their pain threshold is pushed. Other behavior problems may have underlying medical conditions. When in doubt, get it checked out!
Exploring the wolf inside the poodle
Dogs inherit most of their behavior from a common ancestor, the wolf. Yes, even a dog such as a Poodle, who looks nothing like a wolf, has inherited the basic instincts from that ancestor. Looking at your dog’s behavior from that perspective, you quickly understand why grooming with brushes, combs, and clippy things can be so distressing. In even the most docile Cocker Spaniel beats the heart of the wolf.
Technical Stuff
Because the dog has wolf-like preprogramming at the heart of her behavior, she automatically reverts to it whenever the civilized trappings fall by the wayside. Instinctive reactions to fear, hunger, anger, and pain all come not from the civilized dog but from the wolf inside; it’s a survival mechanism. The wolf has been around a long time and knows how to deal with those feelings. The dog, on the other hand, has become civilized during only the last 20,000 years or so (125,000 years, if you believe the genetic mathematics). Regardless, wolves have been around much longer, and the domesticated dog is simply a descendant of the wolf.
Why is this history lesson so important? Because you need to understand that when you’re faced with a frightened or angry dog, you’re faced with an instinct as old as the wolf — not some sweet little puppy dog.
Reading dog behaviors
Be aware that any dog has the potential to bite — from the seemingly harmless Yorkshire Terrier to the so-called dangerous dogs like Pit Bulls. (I say so-called because plenty of nice Pit Bulls are out there — it’s the training, not the breed.)
The truth is that getting bitten is unpleasant even when you’re bitten by a small dog. (I’ve been bitten by a Schnauzer and a Keeshond, and it was very painful both times.) So you need to be aware of the signs of a frightened or angry dog before the dog gets an opportunity to bite. A dog may bite at various times, even while being groomed. In the sections that follow, I give you enough foresight to see a potential bite in the making, because most of the time, bites are reactions to fear, pain, or anger.
Handling fearful dogs (submissive behavior)
Fearful dogs usually become submissive first. They’re tentative, shy, and usually don’t want anything to do with you. A submissive dog — one who’s crouching down with tail tucked between his legs, ears laid back flat, and eyes averting your gaze — may bite to try to get away from you in a real response to fear. Eyes of fearful dogs open wide to the point where you can actually see the whites of their eyes quite well. Pursuing such a dog is the worst thing you can do — whether you intend to grab him by the collar (a threatening gesture in the dog’s mind) or corner him (providing no way out, which heightens the panic) or force him into submission (again, you’ve just pushed the wrong buttons).
Dogs who are fearful usually bite once or in a flurry, either way intent on telling the attacker (you, in their mind) to leave them alone. The dog just wants to get away and calm down.
When dealing with this type of dog, remove the threat — talk in an upbeat and happy tone, and offer treats and snacks. Or you can let him have his space for a while to calm down, and then try again to offer something positive.
Warning!
Some dogs are natural fear biters, meaning they react by biting whenever anything unusual happens, because they’re automatically left alone after they bite, thus reinforcing a very bad behavior. When dealing with that kind of dog, you need to use a muzzle to avoid becoming another victim.
Remember
You can greatly reduce a dog’s anxiety by moving slowly and deliberately and not pushing. Keeping the atmosphere as upbeat and positive as possible goes a long way toward reducing a fearful dog’s stress.
Dealing with dogs in pain
Dogs who are in pain are usually pretty obvious. They cry or whine from the pain and seek whatever way possible to relieve the pain. Dogs in pain don’t know or care that you’re there — they’re just reacting out of instinct.
Warning!
Never attempt to handle a dog who’s in pain unless you’re taking the dog to the veterinarian. In that case, you need to muzzle the dog and take her in for treatment immediately.
In some cases, something you do accidentally can cause a dog pain. When the pain is beyond the dog’s threshold, she’s going to snap, and that may injure you. For that reason, exercising care and using a muzzle are the best courses of action whenever you’re doing any grooming procedure that may hurt your dog.
Remember
You will never be able to rationally confront a dog who’s in pain. No matter how gentle the dog is (or you are), when she’s in pain, she’s going to snap just like the fearful dog. She doesn’t have a clue what she’s doing — she’s just trying to protect herself. If you must handle a dog who’s in pain, always use a muzzle. If you have no muzzle available, follow the directions for how to make one in Chapter It’s Showtime! Grooming a Dog for the Ring.
Getting help for your aggressive dog
Dogs who are truly aggressive are angry at you for daring to do what you’re doing. An aggressive dog may be:
- A dominant dog who looks on you as challenging his authority.
- A suspicious dog who’s guarding a treat, bone, or other dog possession.
- A frustrated dog redirecting that frustration as aggression toward you.
- A prey-driven dog who views you as his next quarry.
A dog’s aggressiveness is pretty obvious. Aggressive dogs bark and snarl at you in a challenging manner. Their hackles rise as they lift their lips in a snarl and gaze at you with hardened eyes, without any reservations about staring at you right in the eyes with their own challenge.
Warning!
Needless to say, aggressive dogs are downright scary, and you should never handle them — at all. If you own one of these dogs, I suggest that you seek help from a dog behaviorist, a veterinarian, or other dog professional when it comes to working with an aggressive dog.
Considering muzzling versus medication
Deciding whether to muzzle or medicate a dog depends on you and the dog. Say, for example, that you have a difficult dog and perhaps he’s fearful of the entire grooming process (bad experiences) or just struggles a lot. You’ve tried training the dog, but your valiant efforts have failed, or at least it’s going to take a long time before you can coax your dog to cooperate.
You basically have two options; however, you may not consider either of them particularly satisfactory. One option is muzzling the dog, and the other is medicating the dog. I tell you about each method in the next two sections.
Muzzling
When muzzling your dog, you slip on a muzzle, a device that slips over your dog’s nose and mouth to prevent him from biting you when you do a particular grooming procedure, such as brushing him out, clipping his coat, or trimming toenails. The positive sides of using a muzzle are that your dog isn’t groggy or doped-up with potentially dangerous chemicals, and you’re not bitten.
Warning!
The downside is that muzzling can be dangerous during hot weather, when the dog can overheat. Muzzles also can force a dog to start behaving more aggressively, because you’ve restrained him. It also looks bad. People who may be watching you handle your dog can get the wrong impression about your dog, and your dog can develop a bad reputation when someone sees him restrained with a muzzle.
Muzzling should be done only as a last resort — for example, when you know that your dog is going to snap whenever you trim his toenails and that the only way to stop the snapping is to muzzle him. You slip the muzzle on, trim his toenails, and slip the muzzle off. The toenails are done, and neither of you are worse for wear.
But muzzling won’t help you retrain your dog to accept the procedure. In fact, you may find him even more difficult, because now he knows he has no choice and you’re going to restrain him. So unless there’s really no way around it, leave the muzzle off.
If you have to muzzle your dog, choose a good groomer’s/veterinarian’s muzzle that fits your dog’s head and the shape of his muzzle (foreface). They’re usually made of nylon and are intended to prevent a dog from biting. They are not, however, supposed to be used for any length of time. Most muzzles aren’t made to wear for any longer than a few minutes.
Warning!
If you decide to muzzle your dog, put the muzzle on right before the procedure and take it right off afterwards. Never leave a dog with a muzzle unattended, and never leave him alone with a muzzle for any length of time. A dog can overheat while wearing a muzzle, because it restricts breathing and prevents panting. Furthermore, your dog can hurt himself trying to take the muzzle off, or he can catch it on something and it can choke him.
Medicating
With the exception of some homeopathic and herbal combinations (such as Bach Flower Rescue Remedy), you must obtain all medications from your veterinarian. The common medications used by veterinarians to calm dogs are acepromazine, diazepam (Valium), or other drugs such as cloricalm.
Warning!
The problem with medications is that they can have adverse side effects. For example, acepromazine can cause seizures in seizure-prone dogs. In many cases, these medications can affect your dog’s metabolism, making her more susceptible to chilling or overheating.
If you decide you must medicate your dog, talk it over with your veterinarian. Ask about possible side effects and problems associated with medicating your dog while grooming. Ask for possible alternatives — some newer medications may be available. The main thing is to understand how to use the medication and in what circumstances you can use it and to understand what alternatives may be available.
Holistic types of medications that you can try with your dog include Bach Flower remedies or homeopathic and herbal supplements that have little or no side effects. However, whether they actually work is debatable. I’ve had good luck with Bach Flower Rescue Remedy and Dr. Goodpet’s calming medications, but that’s just my own experience, which doesn’t have any documented scientific basis behind it. Check with your vet before giving any holistic medicines to your dog.
Restraining a difficult dog
Restraining a dog is something you may have to do occasionally. No dog loves staying in the tub or on the grooming table for very long, so you have to restrain your dog once in a while to get the job done.
Crates
If you need to keep your dog in one place while you get your things together, use a travel carrier or crate. These are useful devices for keeping your dog in one place without forcing him to be tied up or restrained in any fashion.
The downside to crates is airflow. Don’t leave your dog in a crate in the hot sun or in a place where he can’t get good airflow and can accidentally overheat. You can’t wash or brush a dog in a crate or do any other procedures on him.
Tub tie-outs and bathing nooses
Plenty of tie-outs and nooses are available for washing a dog. These devices generally work by hooking to your dog or your dog’s collar to hold him in place. The idea is to keep a medium or big dog in the place where you need him to stay while you bathe him.
Warning!
Never use training collars, choke chains, or other similar devices with tie-outs or nooses. Your dog can choke himself. Likewise, never leave your dog unattended in one for even a moment for the exact same reason.
Grooming table nooses and body restraints
Various gadgets are available for keeping your dog restrained while he’s on the grooming table. Most involve grooming nooses that hook to the grooming arm of the table. These devices, which slip around your dog’s neck, are cable nooses that hold the dog’s head up while you work on him. Other body restraints hook off these nooses to keep a dog standing in place. A variety of slings are also fashioned for these purposes.
Warning!
Grooming table nooses and body restraints are extremely dangerous whenever a dog is left unattended while attached to one of them. Dogs can choke to death by hanging or even get terribly tangled. If you use one, be sure your dog doesn’t struggle constantly while attached to it, and never leave him unattended in one of these devices for any reason. If you use a noose, get a nylon one with a quick snap release so you can quickly free your pooch in case of an emergency.
Body sacks and other devices
Body sacks and other restraining devices are usually used by groomers to handle small breeds and cats. They look like a mesh sack that you put your pet’s head through. The idea is to restrain the dog or cat so you can bathe him. A few are equipped with holes so you can clip nails. Again, a body sack isn’t an ideal tool for restraining the dog, and no dog (or any animal) should ever be left alone in one, because he can get tangled up, panic, or become overheated in one.
by Margaret H.Bonham

