- Recognizing the power of your approval
- Speaking the same language
- Equipping yourself with all the right tools
- Preparing your dog to respond to special training gadgets
Before you begin training, you need to do a little prep work. Part of it’s physical; for example, you have to get all your training gear in order. And some of your preparation is mental — getting an idea of how your dog thinks, for example, and figuring out how all your training gadgetry works.
Turning Your Dog onto Learning
Warning!
Dogs often perceive negative attention as confrontational play. Dogs are very keyed into what gets your attention and, like children, they don’t seem to care whether the attention they’re getting is negative or positive. Rather than subduing a dog, yelling or using physical correction excites them or, worse, creates a gripping sense of fear. As you flip through this book, teaching your dog skits and routines, remember the adage: You attract more dogs with praise than punishment.
Praising your pooch
Remember
The intensity of the praise you should give your dog is a very individual thing: Too much can excite an active dog. A shy or hesitant dog can miss too little encouragement. And some dogs actually get frightened when humans bend over and pet or hug them enthusiastically. To find out what works best for your dog, offer praise and watch her response:
– If she’s so thrilled with herself that she has troubling focusing again, notch it down.
– If she’s hard to motivate, ratchet up your praise and find a toy or treat that gets her attention.
– If your dog freezes or pulls back when you bend to touch her, don’t take it personally; your dog is conflicted. What is praise to you may seem to be a dominance display or a threat to her personal space. Use food and verbal praise to reward this dog.
Choosing rewards
– Treats: Figure out what excites your dog. Is it food? If yours turns up her nose at dried kibble, test her with a tiny piece of hot dog or a more exciting snack.
Tip
When using food to guide or reward your dog (in dog lingo, this is called luring), break the snack into tiny pieces so she won’t get filled up and lose interest in the lesson. It’s not the size that counts; it’s the gift that revs the dog up!
– Toys: Some dogs cling to their toys like a baby to a blanket. If your dog has a favorite, use this to reward her. Do what I call a burst: For each successful attempt, toss the toy either down on the floor or up in the air (let your dog choose which is most exciting) and shout, “Yes!”
– Praise: All dogs love attention. For some, approval alone motivates their interaction for hours. If your dog hangs on you like a noodle, turning up her nose at food and shunning toys, then you have yourself a praise junky, a rare dog indeed. Use your enthusiasm to propel her mastery of tricks and high adventure.
Remember
Offering rewards is all about timing: Targeting your dog’s success makes your intentions more clear. If you miss the moment, your dog may get the wrong message. For example, when teaching a dog to dance (see Chapter Jumping and Dancing for Joy), you target her for standing on her two back paws; if you praise her as she’s coming down, she may think dancing means the opposite.
Communicating with Your Dog
Tip
When communicating with your dog, use a creative approach and a heavy dose of patience. You need to demonstrate a lot of what you envision, and repeat the word cues again and again. Though your dog can’t fully grasp the complexities of your language, she’ll sure try to figure it out. When your dog finally gets it, she’ll eagerly repeat the routine again and again.
Watching your dog’s earsHere’s a simple way to tell what your dog is focused on: Watch her ears. They’re the canine equivalent of an antenna. Unlike people’s boring, stationary flaps, a dog’s ears rotate to capture and locate sound. Swiveling around, they help find food and alert to danger. When you’re in charge, your dog must focus on you primarily. Ideally, the ears should be relaxed and angled toward you. When an unpredictable distraction alerts your dog, she’ll likely focus on it intently. This is ok . . . for a moment — call her back to you and praise her when she reconnects. If she gets more stimulated and her ears and eyes begin to track the distraction, tug on the leash, say “Nope,” and, when possible, move off in the opposite direction. As soon as your dog shifts her attention back to you, praise her calmly. |
Being the one to watch
Remember
I have a mantra I get my clients to repeat: “The more you look at your dog, the less she’ll look to you.” When you’re teaching your dog tricks or directing her behavior, the goal is that she watch you for signals and directions. If you’re looking at her, she’ll just be confused: Why are you looking at me? I don’t know what to do . . . . Look at your dog to reward her cooperation and to confirm that everything is okay.
Using body language and hand signals
People use body language to support their words. For dogs, the opposite is true — body language is central to their communication, and their vocalization backs it up. Remember, your dog is always watching you for direction.
– Stand upright and proud when directing your dog from a standing position.
– Kneel down or use a chair if an exercise calls for you to be at the same level as your dog.
Tip
To capitalize on your dog’s attention to body language, use hand signals, choosing one for each new direction you teach your dog. Throughout the text, I suggest a hand signal for each trick, though you can modify each if you choose — just be consistent. To direct your dog in front of a crowd without saying a word is rather impressive!
Paying attention to vocal tones
Tip
When giving commands, use a clear, direct, and nonthreatening tone — think of it as a set-the-table tone. Use your regular voice with an ounce of over-enunciation, as though you were speaking to a toddler or directing a foreign tourist to the nearest gas station. After your dog learns a particular behavior, you can use hand signals or whisper commands. But in the beginning, speak clearly.
Outfitting Your Dog for Training
The goal of tricks, agility, and other sporting adventures is to direct your dog off-leash, encouraging her to focus on your hand signals and verbal commands. If the thought of having your dog off-leash makes you nervous, take a deep breath. You don’t have to unclip your dog before you’re ready. I cover basic training and off-leash lessons in Chapter Encouraging Self-Control before You Launch into Lessons. This section gives you a thorough understanding of the equipment you use toward that end.
Collars
– Martingale collars: These collars come in two types: all fabric and a fabric-chain combination. Safer than chain collars (also called slip collars or choke chains), Martingale collars circle the neck and have a slip section that offers a corrective tug when a dog pulls away. The chain version also offers a corrective zipping sound that discourages pulling and misbehavior.
Tip
Use positive encouragement as your dog walks at your side. Reward your dog when she’s walking near you with food/toy rewards and verbal encouragement. This will help her recognize and rely on you to lead her. Explore the clicker and target stick too — these tools will speed up this very basic understanding. If your dog darts off, stop calmly — when she hits the end of the leash the collar’s quick tug will be enough to remind her: Walking with you is good. Darting away, not so good!
– Head collars: A head collar lays over a dog’s nose and secures behind her ear. Although some think the head collar looks like a muzzle, head collars act more like a halter placed on a horse — you use them to guide movement, not inhibit it. The benefit of a head collar is that it can condition cooperative skills if you reward your dog for walking at your side. Gently guiding a dog instead of yanking on her neck, it can work wonders if you’re trying to restrain a hyper or headstrong dog.
Harnesses
– Traditional harness: This basic harness can incite pulling when you’re reviewing basic training, but it may be ideal for directing your dog through active or complicated exercises, such as the retrieving skills found in Chapter Go Fetch! Finding and Retrieving Tricks and sporting games like agility and flyball.
– No-pull harness: A no-pull harness is helpful to condition basic cooperation skills such as leash-walking and household calmness. This contraption discourages forward motion by applying pressure to your dog’s shoulder blades; however, the no-pull harness must be removed when practicing tricks and active sporting lessons. There are two types of no-pull harnesses: One affixes over the shoulders and around the armpits and the other crosses over the chest. You can explore either option, though both must be fitted properly to ensure effectiveness and safety.
Leashes, short and long
– Teaching Lead: This patented leash is a little invention of mine. The difference between the Teaching Lead and garden varieties? You have the option of wearing my leash like a belt instead of holding it. I know that may sound funky, but it’s pretty cool.
- Leading, which encourages focus and quick responses to commands
- Anchoring, which teaches your dog to lie next to you when you’re sitting
- Stationing, which teaches your dog her place in each room of the house and allows you to secure her outside if the situation calls for her to stay
Because dogs get more direction and less confinement, they love this lead, too. To get information on where you can purchase one, visit me online at www.whendogstalk.com.
– Drag lead: If you supervise your dog, she can wear a lightweight puppy leash or a thin, 4-foot nylon leash indoors so you can offer gentle guidance or redirection if she acts up or ignores a direction. As you give your dog freedom to explore with her drag leash, use the commands you’ve been practicing (for example, “Sit,” “Down,” and “Stay”) and reward her with food and attention. If she ignores you, pick up the leash calmly and physically position or direct her.
– Short lead: This 8- to 12-inch lead hangs from the buckle collar for guided direction if it’s needed.
Tip
Short leads are incredibly useful when teaching tricks or for other sporting adventures. The light weight on the collar helps your dog maintain her concentration (it feels like a leash is on, though nothing is dragging underfoot) and allows you to handle your dog gently without grabbing at her body or collar, a startling move that elicits an innate defensive response.
– Finger lead: This is a miniaturized short leash: a tiny loop attached to the collar for small or accomplished dogs who may still need guided direction.
– Long line: This 30- to 50-foot line gives you the freedom to let your dog run or work at a distance outside without the fear of losing control — which is especially important if you’re practicing in an unconfined area. These light lines are essential for off-leash work. You can choose to let your dog drag the line provided you’re able to keep track of it, or loop the end and attach your normal leash to the end of it to maintain contact at all times.
– Retractable leash: These leashes stretch and retract and are useful for exercise and trick training that calls for such controlled freedom.
Warning!
Please don’t use a retractable leash near a road; I’ve known dogs to race out in traffic and meet tragic ends.
Tip
If you’ve gotten into a battle of wills using your leash and find yourself having to haul your dog away from certain situations or people, reconsider both your training approach and your training collar. One good session with a respected trainer can give both you and your dog a new lease — or leash — on life!
Training with a Clicker
The click-then-treat approach: Associating the sound with rewards
Technical Stuff
Clicker training is called inductive rather than coercive. Inductive training means the dog repeats behavior because she decides that doing so is in her best interest. Coercive training means she’s being positioned, corrected, or shown a behavior by an outside force, namely the dog’s owner. I’d like to give a 21-tail salute to Karen Pryor — a trainer and friend who brought clickers into the dog world and popularized the concept of inductive training. Believe it or not, the simple toy-like design of the clicker is revolutionizing the way animals (not just dogs but also dolphins, cats, horses, and farm animals) are being treated and trained.
Remember
Here are a few rules of paw for using treats in clicker training:
– No clicks go unrewarded! If you click, you must reward with a small treat. One click, one reward. Even if you make a mistake click, reward your dog.
– All treats should be small and easy to swallow, so your dog can wolf them down and not fill up.
– Don’t treat your dog when she’s not having lessons, or getting a reward won’t seem as exciting.
Using a clicker effectively
Tip
– Use the clicker to reinforce each step of your dog’s trick progression. Think in terms of stage-by-stage training — break the lesson into steps, and click when your dog masters each one; as you build up to the full trick, the dog will have to do increasingly more for a click.
For example, say you want to teach your dog to make a left circle. You first plan to sit with your dog and click when your dog takes one step to the left; that’s stage one. Then you hold out your click for two steps, then three — then a full circle. Training this way definitely takes longer than pulling your dog in a circle, but after your dog figures out the sequence, she does a circle with far more zest and enthusiasm than if you were to tug her around and around.
Remember
– Capture the exact moment your dog is doing something right with a click. If you want to give clicker training a go, timing is everything. A poorly timed click confuses a dog and can result in naughty behavior. Once you’ve clicked, the treat should be given immediately afterward, before requesting another behavior.
– Attach a spoken command to the behavior after your dog has figured out what’s making the clicker work. Use your command after your dog is already offering you the behavior. Initially, click and reward each time your dog sits in front of you. (You may show her a treat or reward to prompt her cooperation, but initially do not use the command.) Once your dog is sitting rapidly, attach the command to the behavior — say “Sit” as she’s planting her bottom on the ground. Once you’ve paired the two, a couple of days later you’re ready to prompt the position by saying the command ahead of time — just before you offer the reward. Command “Sit” first, then click and reward the good behavior. Soon you’ll be able to say “Sit” away from clicker training exercises, and your dog will be spot on.
– As your dog masters each new command, begin phasing off the use of the clicker and rewards, but always praise your dog for a job well done. Use the clicker when introducing new concepts and behaviors to highlight their importance.
Looking at examples of clicker training
– Housetraining: When your dog eliminates in the right area, click and reward. After your dog associates the sequence, say “Get busy!” When she’s eliminating, click the instant she finishes, treat, and praise.
– Not jumping: When your dog jumps on you, look away. Click, treat, and pet your dog as soon as all four paws are on the ground. You can command “Four on the floor” as soon as the dog understands the sequence.
– Chewing on the right things: Anytime your dog is chewing an appropriate object, click, treat, and praise warmly. Put the word “Bone” or “Toy” on the behavior as soon as the dog understands the sequence.
– “Sit”: Click, reward, and praise the moment your dog plants her tush on the ground. Command “Sit” as soon as the dog understands the sequence.
– “Down”: Lure your dog into position with a toy or treat. Click, reward, and praise. Command “Down” as soon as the dog understands the sequence. Good dog!
– “Come”: You first have to condition this command as a sensation of closeness. Throughout the day, click and reward anytime your dog stands near you. Next, encourage your dog to look up by sweeping your hands to your eyes. Click and reward. Command “Come” as soon as the dog understands. Gradually extend the distance and increase the distractions, working in a safe environment.
Checking out why it’s not for everyone
Remember
Although I can guarantee the clicker’s effectiveness, it’s not the only way to teach your dog. If the preceding sections leave you turned off to trick training, don’t be; remember, there are many ways to teach dogs. A better option for you may be to insert a sharp word cue like “Yes!” or “Good!” each time your dog successfully completes a maneuver, and leave it at that. The take-home message here is that a sharp, declarative sound used to target breakthroughs in cooperation helps your dog understand what you want her to do.
Taking Training to Another Level with Targets
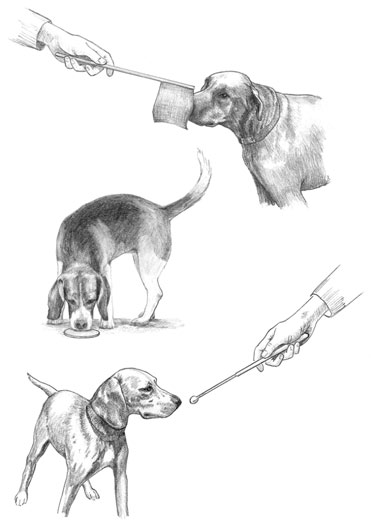
The tools of target training include target flags (a), target discs (b), and target sticks (c), as shown in Figure 2-1.
Delivering to a target flag
This is a fun game to practice.
Add a word like “Flag” to the exercise, so you’ll be able to direct her in more-complicated trick sequences.
Show your dog by moving with her how to navigate to the flag when you’re not holding it.
Warning!
Practice one maneuver at a time when using target training — learning them all simultaneously can get pretty confusing!
Standing on a target disc
Watch her closely. She may sniff it, then shift it about. The moment your dog steps on the disc, click or say “Yes!” and reward her.
I say “Target” as I wave my right index finger to the side.
Tip
Teaching your dog to navigate to a target disc may require some patience and self-control. Too much excitement can derail a dog’s concentration. Some dogs pick this up quickly, whereas others take a couple of weeks to figure it out.
Pointing the way with a target stick
With a target stick, you can direct your dog from greater distances or guide her through courses and over obstacles. Sound intriguing? I find it very useful. Think of an elongated pointer directing you along a mysterious pathway. That’s a good analogy of how a target stick can enlighten many of the routines in this book.
The moment she reaches out to sniff it, say “Yes!” or click and reward her. Practice this no more than five to seven times per lesson.
Soon your dog’s excitement will build each time she sees her target stick.
Use your stick like a pointer. Gradually extend it farther away from your body as you signal with it as if it’s an elongated fingertip. Sweep it just above your head to direct “Sit,” drop it down between your dog’s front paws for “Down,” and hold it against your body (at your dog’s nose level) to encourage positive walking skills.

