In This Chapter
- Keeping a first-aid kit ready in your car and in your home
- Knowing how to administer CPR to your dog
- Using basic first-aid techniques to deal with common injuries
- Knowing what to do if your dog becomes lost
Being Prepared for an Emergency
Assembling a canine first-aid kit
Remember
Your first-aid kit doesn’t need to be big or expensive to be useful.
Getting the container ready
Tip
Put a large red cross and the words first-aid kit on each side of the container. Someone may need to locate and use it in an emergency, and labeling the kit clearly can be a big help. To the inside of the lid, tape a piece of paper with the following information in clear letters (do this for each dog):
– Your name, address, e-mail, and telephone number.
– The breed, name, and date of birth of the dog.
– Any medical conditions your dog has and any regular medication.
– Names, addresses, and telephone numbers of emergency contact people, in case you are incapacitated.
– Name, address, and telephone number of your veterinarian. Be sure to provide the contact information for your after-hours emergency clinic.
– Contact information for the National Animal Poison Control Center. You can reach the center at 888-426-4435, 24 hours a day, 365 days a year to inquire about the toxic potential of various household products and plants your dog may have found tasty. You also can get advice about emergency care for a dog who has gotten into a toxin. The cost per case is $60, which includes follow-up (including contacting your veterinarian, if you request), and is charged to a major credit card. To have the fee charged to your telephone bill (and avoid having to track down your credit card number in an emergency), dial 900-680-0000. For more information on the service, visit www.aspca.org.
– A list of the contents of your first-aid kit. For each of the drugs in the kit, have a note indicating the appropriate dose for each of your dogs. That way, you won’t have to do any calculations in your head in a time of crisis. When preparing the kit, be sure to check the doses with your veterinarian.
– Your dog’s rabies certificate: Some states require that you have a rabies certificate at all times if you are traveling with a dog.
– A photograph of each dog, with her name, tattoo, and microchip number: This can help a rescuer identify each dog if you are incapacitated.
Tip
Keep these materials in a resealable plastic bag so they’re all together.
Knowing what to put in the first-aid kit
Tip
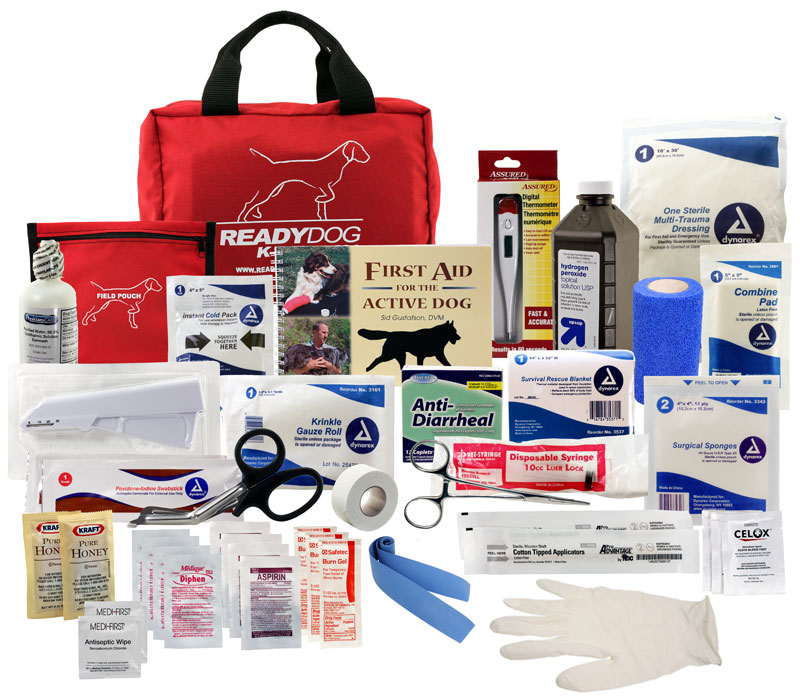
With time and experience, you may add other items to the kit, because you may find yourself using the kit for yourself and other humans in need. You may also find that you don’t need some of the items. Eventually, your first-aid kit will reflect you, your dogs, and your needs. But the following supplies are a good place to start:
– ACE brand elastic bandage: You can use this bandage to hold an ice pack to a dog’s leg, to wrap (not too tightly!) a sprain temporarily until you can get veterinary assistance, or to secure an injured dog to a makeshift stretcher.
– Adhesive tape: Use tape to secure bandages and splints. Make sure that you have a large roll, and replace it when it gets close to running out.
– Alcohol swabs: Look for individually packaged swabs, which you can use to sterilize instruments or small areas of skin.
– Aspirin (enteric coated): Give 5 milligrams per pound every 12 hours to temporarily relieve pain. Many dogs vomit after taking regular aspirin, so be sure to get the enteric-coated variety, which is gentler on the stomach. Or get NSAID from your vet, specially formulated for dogs.
Warning!
Never substitute ibuprofen or acetaminophen for aspirin. Both of these substances can be toxic to dogs.
– Bacitracin or Neosporin: Apply this or another antibiotic ointment to cleaned wounds that are likely to become infected.
Warning!
Never use these ointments in the eye. Special antibacterial formulations are used for the eyes — but use them only with your veterinarian’s recommendation.
– Benadryl: You can use Benadryl for insect bites or stings. Give your dog 11⁄2 milligrams per pound, every eight hours.
– Cohesive bandage: Use this stretchy wrap to cover and secure gauze bandages. It clings to itself, so you don’t need adhesive tape.
– Cold pack: Use a cold pack to prevent or reduce swelling after a sprain or strain, or to treat burns. Buy the kind that gets cold when you fold it in half.
– Cotton squares: You use these to clean and protect wounds. They’re better for cleaning wounds than cotton balls because they don’t shed fibers when you wipe them over sticky areas, such as where blood is drying.
– First-aid instructions: Photocopy the pages of this chapter that discuss first-aid treatments and store them in your first-aid kit. When you’re trying to take care of a sick or injured dog, remembering all the details can be difficult.
– Gauze bandage roll: You use this wrap to bandage wounds and hold splints in place. Cut off a length of bandage and fold it up to cover a wound, or wrap the bandage around the leg to keep a cold pack in place or secure a splint.
– Gloves (latex): Any time you need to keep your hands protected or clean, wear a pair of latex gloves.
– Green Soap or Hibitane: You can use any gentle liquid antibacterial soap for cleaning skin and wounds. Betadine or iodine solution are good wound cleaning solutions.
– Hydrogen peroxide: Give your dog 1 to 3 teaspoons of hydrogen peroxide every ten minutes to induce vomiting. Don’t give more than three doses ten minutes apart, and don’t use it to clean wounds.
– Imodium A-D: Give your dog 1 milligram per 15 pounds once or twice a day to relieve diarrhea. May contain aspirin and irritate the stomach.
– Lubricating jelly: Use this item to lubricate a thermometer or to prevent gauze bandages from sticking to a wound. It also comes in individual packets.
– Muzzle: You can use a length of gauze bandage, a belt, or a soft rope to make an emergency muzzle. Even if your dog has never showed signs of aggression, if he is in pain or is frightened, he may snap at you or others.
– Needle and thread: For emergencies only! Use a needle and thread to stitch wounds (or — better — a surgical stapler purchased from your vet) when you know you won’t be able to get veterinary help within six hours. Bear in mind that your dog will not like (or perhaps allow) you to suture him. Clean wounds before closing them.
– NuSkin liquid bandage: Use for small, clean, recent wounds.
– Penlight flashlight: Use a flashlight to look down your dog’s ears or throat — anywhere you need extra light. You can also use it to check whether a dog’s eyes respond to light, in case of an injury to the head.
– Pepto-Bismol liquid: Give 1 teaspoon per 25 pounds every 6 hours to relieve diarrhea and vomiting. The liquid form works faster than the tablet form. May contain aspirin and irritate the stomach.
– Plastic bags (resealable): These bags are handy for temporarily packaging items that are leaking, protecting open packages from drying, or collecting specimens such as fecal samples.
– Razor blade (retractable) or blunt-ended scissors: Use these items for cutting bandages and tape and for trimming the hair around a wound.
– Safety pins: Use pins to fasten bandages if you don’t have tape.
– Sterile saline solution: Use to rinse out the eyes or to clean wounds.
– Stockinet or bootie: Put one on your dog to protect a bandage on a leg or foot.
– Styptic powder: Use to stop small areas of bleeding, such as when you accidentally clip your dog’s nails too close.
– Sun block: Apply to your dog’s nose or areas of light skin if your dog has a thin coat.
– Syringe: Use to flush a dog’s eye with saline or to administer peroxide.
– Thermometer (rectal): Use a thermometer made for dogs. A dog’s normal body temperature is between 100.5 and 102.8 degrees.
– Tweezers (flat-ended): You can use tweezers to remove foreign objects, such as ticks, thorns, and foxtails, from your dog’s skin.
Tip
Keep a blanket in your car at all times. You can use it to warm a dog suffering from frostbite, to wrap a dog who is in shock, or as an emergency stretcher.
Remember
Label each item in your first-aid kit with its name and expiration date. Go through your kit before trips and every year, replacing medications that have expired or for which the labels have become hard to read, and replenishing supplies.
Knowing your dog before an emergency
Taking your dog’s temperature
Talk to your dog and praise him for remaining still. The first few times you do this, you may want to have someone give him a treat while you are inserting the thermometer, to keep his mind occupied.
A dog’s normal temperature ranges from 100.5 to 102.8 degrees. The temperature can rise significantly after exercise, but it should return to normal within 20 minutes.
Counting your dog’s breathing rate
Checking your dog’s pulse
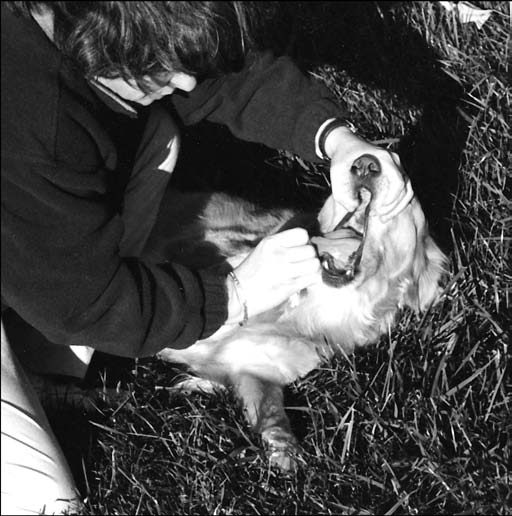
Examining your dog’s gums
Tip
If the gums are blue, the dog lacks oxygen. If they are white, the dog has lost blood, either internally or externally. If the gums are purple or gray and there is a slow capillary refill, the dog is probably in shock. If they are bright red, she may be fighting a systemic infection or may have been exposed to a toxin. Sometimes normal dogs have black-pigmented gums, which can make assessment more difficult. For these dogs, you need to examine the pink tissue on the inside of the lower eyelid by gently pulling down the eyelid. In this case, you can only observe the color of the tissue — you can’t perform the capillary refill test — but the colors in the preceding paragraph apply.
Knowing What to Do in an Emergency
Approaching an accident scene
Tip
If other people are nearby, try to organize them to be a help rather than a hindrance:
– Ask a few people to keep passersby away from the dog.
– Ask one person to call a local veterinary clinic.
– Have another person arrange to transport the dog.
– You may also have someone assist you in performing CPR and have another person apply pressure to any wounds.
Handling an injured dog
Tip
To apply a muzzle, follow these steps:
4. Bring the bandage back under the dog’s chin and tie another single knot under the chin.
Examining an injured dog
Airway
Breathing
Tip
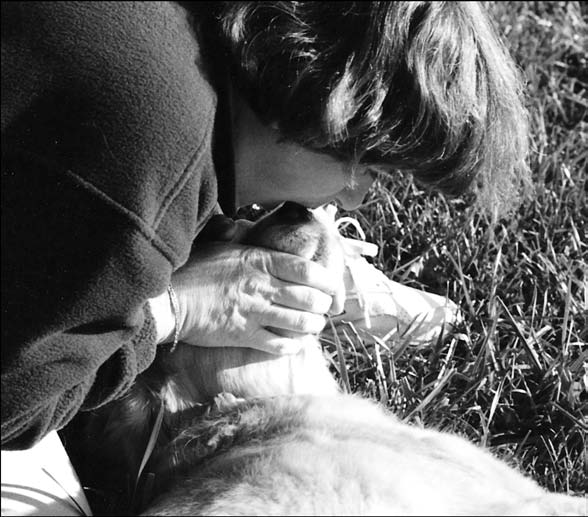
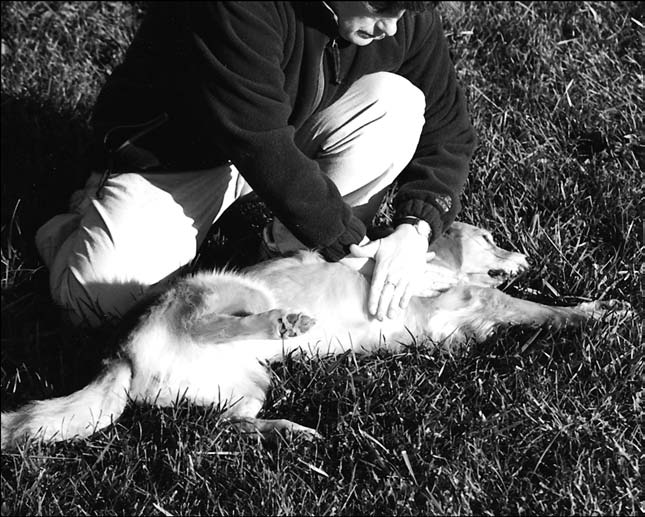
Check for the rise and fall of the chest that indicates the dog is breathing. If the dog is not breathing and the airways are clear, begin rescue breathing immediately:
Repeat for a total of three breaths.
Warning!
Give gentle puffs of breath (the amount depends on the dog’s size). Your lungs are much bigger. Don’t blow as though you’re trying to inflate a balloon.
Circulation
Tip
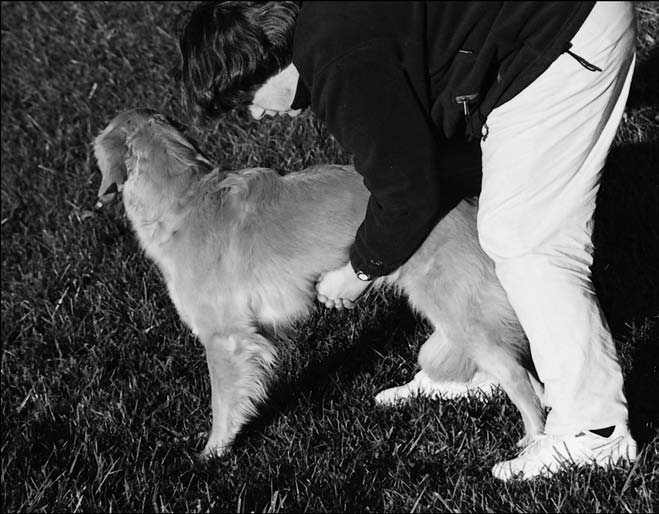
If you have trouble feeling the pulse in the groin, place your thumb and fingers on either side of the chest wall just behind the elbows to see if the heart is beating. If you detect no pulse or heartbeat, begin CPR immediately (see following section).
Administering CPR
Watch for the chest to rise, to be sure that the air is getting into the lungs. If the chest doesn’t rise, check again for anything that may be obstructing airflow.
Tip
Compress at approximately the speed of the beat from the Bee Gee’s “Stayin’ Alive” or Queen’s “Another One Bites the Dust.”
Giving first-aid treatment
Remember
Knowing these first-aid techniques should help you in an emergency. But this is first aid — basic techniques to help you aid your dog before you can get veterinary assistance. First aid is not a substitute for the care and expertise of a veterinarian.
Allergic reactions
– Hives or swelling of the muzzle: Some dogs respond to an allergen with swelling of the face or bumps that appear over a large part of the trunk. You may also see the dog biting or licking at herself, or she may have red, weeping eyes. Apply a cold pack to the swollen area if it is small. If the swelling continues or covers a large area, administer Benadryl (at 1 to 11⁄2 milligrams per pound) and contact your veterinarian. Check respiration periodically, because there may also be swelling of the throat, which can impair breathing.
– Shock: Signs of shock include weak or rapid pulse; shallow breathing; gray, purple, or pale gums; glazed eyes; weakness; or collapse. Lay the dog on her side and cover her with a blanket. Administer CPR, if necessary. Transport the dog to a veterinarian as soon as possible.
Bleeding
Technical Stuff
Tip
If ice is available, place it around the area of the wound to slow blood flow. When the bleeding has stopped, you can bandage the wound (see the “Wounds” section later in this chapter) and arrange to get the dog to a veterinarian.
Warning!
Only use a tourniquet in extreme emergencies, because it can cut off necessary circulation to the area. See a vet immediately after use.
Broken bones
Tip
If veterinary care is available, do not apply a splint. Carefully place the dog on a firm, level surface and take her to the clinic. If you are far from veterinary help, the leg should carefully be splinted before your dog is moved. The best splint is something rigid but padded, such as a board wrapped in a towel. The splint should be placed against the dog’s limb, avoiding movement of the bones as much as possible. The leg and joints above and below the break should be taped or wrapped to the splint. (Do not bandage fractured ribs, spine, or pelvis.) Transport the dog to a veterinary clinic as soon as possible.
Technical Stuff
A fracture is a partial or complete break in a bone. Fractures are classified by severity, and the same classifications apply for both dogs and people:
– Greenstick fracture: The least serious fracture is the greenstick fracture, in which one side of the bone is broken but the other side is just bent. The two ends of the bone are not moved from their original positions. This type of fracture is seen more often in young, growing dogs because their bones are less brittle than those of adult dogs. A dog can walk (though gingerly) on a leg with a greenstick fracture; only X-ray can diagnose this kind of fracture.
– Complete fracture: A complete fracture is one in which the bone is broken through its width. Generally, the two ends of bone are moved from where they should be, because contractions of the muscle move the broken pieces of bone away from their original location. A complete fracture is more serious than a greenstick fracture; the damage to the bone is greater, and the surrounding muscles and maybe even ligaments and tendons are usually damaged. Complete fractures can be one of three types:
- Simple, with just two pieces of bone
- Comminuted, with many pieces of bone
- Compound, with skin punctured by pieces of bone
No matter what kind of fracture it is, a veterinarian must return all the pieces of bone to their original location before healing can begin.
Burns
Technical Stuff
Burns are classified by degrees, depending on their severity:
– First degree: The hair is singed and the skin may be reddened.
– Second degree: The hair is burned off and the skin is red and blistered.
– Third degree: The skin is black, brown, or white. If the third-degree burn is extensive, the dog may go into shock.
Tip
If a caustic liquid caused the burn, wipe or rinse off the liquid before treating the burn. For all burns, follow these treatment suggestions:
– Minor burns (first and second degree): If the burn occurred within the last hour, apply a cold pack for 20 to 30 minutes and then treat the burn as a superficial wound (see “Wounds” later in this chapter).
– Severe burns (third degree): If your dog permits, apply a cold pack or a cold, wet cloth to the area; cover the area gently with gauze; and take him to the veterinarian as soon as possible.
Warning!
Never apply ointments or butter to severe burns, and never touch the skin or rub anything on it.
Choking and the canine Heimlich maneuver
Tip
If you suspect that your dog is choking, first examine her mouth. Pull the tongue forward and remove the foreign object, if possible. If you can’t see the foreign object, use the canine Heimlich maneuver to try to dislodge the object:
– For large dogs: Stand behind your dog and place your arms around her body. Make a fist with one hand, and place the thumb of the hand with the fist against your dog’s abdomen just where the sternum ends. With the other hand, grasp your fist and push upward and forward (toward the dog’s shoulders), suddenly and forcefully (see Figure 3-4). Do this thrusting motion four or five times. Check the dog’s airway again and clear any debris from the mouth. Repeat the chest thrusts, if necessary. If the dog is unconscious, clear the airway and perform rescue breathing.
– For small dogs: Hold the dog with her head up so that her spine is against your chest. Make a fist with one hand, and place it against your dog’s abdomen just where the sternum ends (see Figure 3-5). Grasp the fist with your other hand, and give four or five rapid thrusts inward and upward. Check the dog’s airway again and clear any debris from the mouth. Repeat the chest thrusts, if necessary. If the dog is unconscious, clear the airway and perform rescue breathing.
Cold exposure
Tip
If you recognize that your dog has hypothermia, follow these suggestions:
- Move the dog to a warm environment and cover him with a blanket.
- Rub his body (not his legs) gently, to increase circulation.
- If he’s wet, dry him with towels or a blow dryer on medium heat.
- Take your dog’s temperature to monitor his recovery.
- Offer warm sugar water if the dog is conscious.
Warning!
Do not apply heating pads or hot water bottles directly to your dog’s skin.
Tip
If the dog begins to lick his paws or appears uncomfortable, he may have frostbite. Restrain him and place warm compresses on the affected area.
Diarrhea
Tip
If your dog has diarrhea, withhold food for 24 hours in adults or 12 hours in puppies (younger than 6 months). Instead of giving water, offer the dog ice cubes so that she takes in the water slowly. Some vets don’t recommend this, but you can administer Imodium A-D (1 milligram per 15 pounds once or twice a day) and/or Pepto-Bismol (1 teaspoon per 25 pounds every six hours) to help calm an upset stomach and stop diarrhea. For the next 72 hours, feed a bland diet (75 percent rice, 25 percent low-fat protein such as skinless chicken) in small but increasing amounts. Then shift to the dog’s regular diet over the next two days.
Warning!
If your dog has bloody diarrhea, is depressed and dull, or continues to have diarrhea for 24 hours while you are withholding food, take her to a veterinarian.
Drowning
Tip
The first thing to do when you have brought the dog ashore is to empty the lungs of water. If the dog is small, elevate his rear end and water will drain out of the dog’s mouth. If necessary, you can hold the dog upside down and swing him gently until the water is expelled. Pumping the chest and opening the mouth periodically may be helpful as well. If the dog is large, try to sling him over your shoulder so that the head, front legs, and chest hang down in front of you and the rear legs hang down your back. When the water is expelled, start rescue breathing. When the dog is breathing on his own, wrap him in a blanket and transport him to a veterinarian immediately.
Ear infections
Tip
To clean the ears, moisten a cotton swab with alcohol or hydrogen peroxide and clean the outer ear, making sure to clean around all the bumps inside the ear and down into the ear canal. Don’t go farther into the canal than you can see — you don’t want to risk breaking the eardrum. There are ear-cleaning solutions designed to break up wax and dry the ear canal. If the ear is truly infected it probably needs topical medicine to treat the specific type of infection — yeast or bacteria. If your dog has hair in her ear canal, pluck it to help with air circulation.
Electric shock
Tip
If you find your dog unconscious near an electrical cord, turn off the power to the socket before touching your dog. Examine the dog, using the A-B-C protocol described earlier in this chapter. Administer CPR if the dog is in shock or unconscious. When the dog is conscious, give first aid for burns and get him to your vet immediately.
Eyes
Tip
Dogs who run through fields may get dust or grasses in their eyes. The best solution is to wash the eye with sterile saline. Hold your dog’s eye open and gently pour the saline over the surface of the eye. Using a penlight flashlight, examine the insides of the lids to be sure that you removed the offending particles. If repeated flushing doesn’t help, get your dog to a veterinarian.
Warning!
If a foreign body is penetrating the eye or the skin near the eye, do not touch it. Stop the dog from pawing at the eye by taping her hind legs together or using an Elizabethan collar (the “lampshade” — a wide cone-shaped collar that prevents the dog from being able to scratch her head). You can make a temporary collar by cutting a head-size hole in the bottom of a bucket and placing the bucket over her head, fastening it to the dog’s collar. Then get your dog to a vet immediately.
Fishhooks
Tip
Start by calming the dog with gentle words and quiet motions. Getting your veterinarian to remove the hook is best, but if you have no access to a veterinarian, you can push the hook through the skin until the tip and barb come back out. Then cut off the hook and barb and back the rest of the hook out the way it came. Treat the hole as a wound (see “Wounds” later in this chapter).
Warning!
If your dog swallows a fishhook, cut off most of the remaining fishing line, leaving approximately 12 inches dangling. Do not attempt to dislodge the fishhook by pulling on the line. Take your dog to a veterinarian immediately. Do not allow your dog to eat in the meantime.
Foxtails
Heatstroke
Warning!
Never leave your dog in the car in the summer, even with the windows down. And never leave your dog in a yard without shade in the summer.
Tip
If you suspect that your dog is suffering from heatstroke, you must act quickly. Move the dog to a cool area indoors, or at least to the shade. Submerge him in cool water (not ice water) and apply cold compresses to his head. Take his temperature to monitor his body’s cooling. Keep him wet until his temperature reaches 103 degrees, and then remove him from the water and dry him off. Encourage but do not force him to drink water. Get him to the veterinarian as soon as possible.
Hot spots
Tip
The first thing to do if you identify a hot spot is to clip the hair away from the area, if possible. This is the best way to prevent the infection from spreading. Once or twice a day, wash the area thoroughly with liquid soap and apply an astringent. The best astringent is tea (green or black). Wet a tea bag and apply it to the area. Keep applying the astringent several times a day until the area is dry and covered with a scab — usually 24 to 36 hours. After the area is scabbed, let it heal, but watch it carefully, in case the infection begins to spread again. Keep the dog from scratching or biting at the area while it is healing; you may need to use an Elizabethan collar (see the “Eyes” section earlier in this chapter for more information). If you cannot get the hot spot under control in 36 hours, see your veterinarian, who may prescribe oral antibiotics and/or anti-inflammatory agents to treat it.
Insect bites
Tip
Usually an insect bite appears as an area of swelling. If the bite is from a bee or a wasp, remove the stinger. If it is from a tick that is still attached, use tweezers to grasp the tick as close to the skin as possible and pull gently until it lets go (see Chapter The Scoop on Dog Food for more information on removing ticks). Apply a cold pack if the swelling is severe.
Poisoning
Tip
If you suspect that your dog has been poisoned, contact your veterinarian immediately for instructions. If you cannot reach your veterinarian, call the National Animal Poison Control Center at 888-426-4435 for help.
Warning!
Do not induce vomiting if the poison is unknown, corrosive, or a petroleum product, or if the animal is not completely conscious.
Porcupine quills
Warning!
Never remove quills from the eye. If your dog has a quill in her eye, calm her down (it is very painful) and tie her legs together to prevent her from pawing at the eye. Protect the eye until you can get her to a veterinarian.
Seizures
– Sit with your dog during the seizure, talking soothingly to him.
– Restrain him only if necessary to keep him from hurting himself. During the seizure, he will have uncontrollable movements and may defecate or urinate.
– Keep your dog quiet for 30 minutes after the seizure.
– If the seizure lasts longer than five minutes or recurs within two hours, take your dog to a veterinarian.
Warning!
Do not attempt to pull the dog’s tongue out or in any way get near the mouth, because severe bites can occur.
Remember
If your dog has a seizure, take him to a vet or (better yet) a veterinary neurologist for evaluation.
Snake bites
Tip
If your dog is bitten by a poisonous snake, do this:
Arrange for the dog to get to a veterinarian immediately.
If the wound is on a leg, leave gauze over the wound and wrap the leg with cohesive bandage tightly, but not tight enough to cut off circulation.
Warning!
Do not cut into the wound caused by a snakebite. Do not apply suction to the wound. And do not apply a tourniquet.
Spinal injury
Warning!
If you suspect that your dog has suffered a spinal or neck injury, be very cautious about moving him, or you could further damage the spinal cord and cause permanent paralysis or even death.
Sprains and strains
Technical Stuff
A sprain is a stretched or torn ligament and a strain is a torn or overused tendon, but the results of both are swelling and inflammation in the area of damage.
Tip
Try bandaging the ice onto the affected area if your dog doesn’t want to let you hold the ice on her body for that long.
Wounds
Shallow wounds
Tip
To treat a shallow wound, follow these steps:
You can slip a stockinet or bootie over a foot and secure it with tape for extra protection.
If they become swollen or cool to the touch, remove the bandage and reapply it after the swelling has diminished.
Tip
If the wound is small and clean, you can use NuSkin to glue the ends of the wound together. It works just like sutures.
Warning!
Cuts that may require sutures should be examined by a veterinarian immediately. If a cut is more than about six hours old, it should not be sutured closed because it almost certainly is contaminated with bacteria from the environment. Suturing the wound closed would just trap the bacteria within the wound, resulting in infection and increased scarring. An older cut should be thoroughly cleaned and allowed to heal gradually as an open wound. If the wound is large, it may be partially sutured and a drain left in to help the infection escape.
Deep wounds
Tip
To treat a deep wound, do this:
If your dog becomes lostFirst of all, you should have your dog “chipped” at the vet. An ID chip is a tiny electronic chip implanted under your dog’s skin. When your dog is found and taken to the pound or a vet, staff members can scan the chip and get your contact info. Of course, your dog also should be wearing an ID tag with your name, phone number, and address. Some chips come with a tag that gives the chip number, which you can read over the phone to the dog pound when someone finds your dog. Some people even make up some generic “Missing dog” posters ahead of time and keep them with emergency supplies. In the biggest type size you can, center the words LOST DOG, along with a clear picture of your dog. Beneath that, provide a description of your dog, including any identifying marks. Leave a space to add the phone number where you can be reached, along with any backup contacts, friends, relatives, neighbors, or your veterinarian. Print a hundred copies and keep them in a safe place. A staple gun allows you to post your notices on anything wooden or cardboard in your neighborhood; keep a loaded staple gun with your supplies, along with thumbtacks and electrical tape. If your dog becomes lost, post the flyers in your neighborhood and beyond, and distribute them at veterinary hospitals and shelters. While relying on the kindness of strangers is nice, offering a reward can make many strangers just a little bit kinder. |
by Eve Adamson, Richard G. Beauchamp, Margaret H. Bonham, Stanley Coren, Miriam Fields-Babineau, Sarah Hodgson, Connie Isbell, Susan McCullough, Gina Spadafori, Jack and Wendy Volhard, Chris Walkowicz, M. Christine Zink, DVM, PhD

