- Carting canines big and small
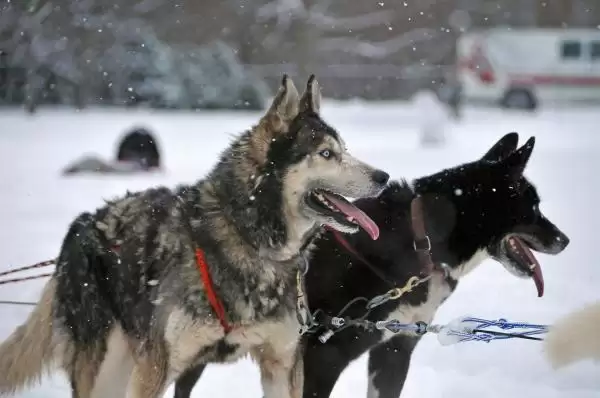
- Sledding in the snow
- Joring: Biking, skiing, running with your dog out in front
This chapter is dedicated to the passionate pullers. Those dogs who, when clipped to the end of a leash, become an unstoppable freight train of fur. Harness — literally — this dog’s enthusiasm for forward momentum, and you’ve got the makings of a grand adventure.
While competitive carting, sledding, and joring teams are usually composed of specific breeds — Huskies, Samoyeds, and Alaskan Malamute-types for snow activities and Newfoundlands and Bernese Mountain Dog-types for carting — for the hobbyist, breed doesn’t matter a bit. In fact, many of the pulling rigs can be found in miniature, so size and weight don’t matter much either. The only prerequisite? That your dog loves to pull!
A Few Caveats
Before rushing into a harness sport, there are a few guidelines that apply to all the sports in this chapter. Following them will ensure your dog’s safety.
– The harness sports are physically exhausting and thirst-provoking! Keep your dog well hydrated.
– Build your dog’s endurance slowly. If he’s overweight, out of shape, or otherwise compromised due to an injury or accident, get your veterinarian’s okay before you begin.
– Don’t ask your dog to pull anything that weighs more than he does before he’s 12 to 18 months old.
– If you have a young dog between 5 and 8 months, start by teaching him the commands and to harness up. Once he understands the commands, you can have him pull lightweight objects, like a 3-foot-long, 2-x-4-inch wooden plank or an old tire.
Canine Carting
Your dog can pull a cart to take the trash out, clean the yard, bring in firewood, or take the kids for a ride. This activity is not limited to big dogs — one of my editors has friends who’ve taught their Chihuahua to pull a cart. She has also witnessed a stagecoach drawn by a team of Chinese Crested Dogs, and a Papillon who impressed the judges at a carting competition. Of course, if you have a team of teacup-sized Malteses, you’ll have to have them cart table utensils, dirty socks, and other weight-appropriate objects!
I’m a big fan of carting. Though I never carted competitively, all my childhood dogs carted me around. My big red wagon was the vehicle of choice, jury-rigged to a makeshift harness we bought from a dog sledding vendor in the middle of winter. Fortunately, these days you can buy quality products on the Internet, making your ride safer and oh-so-smooth.
Warning!
As with all other strenuous activities, check things out with your animal doctor before getting your dog involved in carting. Your dog must be conditioned, trim, and skeletally sound.
Getting carting equipment
Before you dive into an overview of the training process, take a look at carting equipment. For more information, do an online search for dog-carting equipment, or check out the top sites I recommend, including
www.blackicedogsledding.com(they sell carts, too) and
k9carting.com.
Harnesses and lines
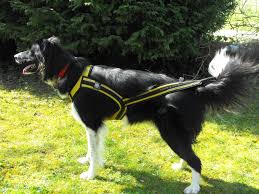
You need a harness for your dog. If you thought he was powerful at the end of a leash, just wait until you get him in one of these things! The following list defines the parts of the carting harness:
– Front girth: This piece stabilizes the harness and helps distribute the weight evenly across the chest and shoulders.
– V1: This piece must fit snugly on your dog’s chest. It distributes the weight over the shoulders. The V should rest at your dog’s breastbone.
– V2: The second V meets at your dog’s withers. It must never fall behind the shoulders, because that would put too much strain on the back.
– Shaft loop: Positioned at the shoulder, this piece balances the cart and prevents it from rolling forward into your dog.
– Side straps: These serve to balance the harness on the dog and help distribute the weight evenly.
– Traces: These connect to the cart.
– Rear girth: This piece centers the harness and falls on your dog’s thighs.
Wagon harnesses, which allow your dog to pull more weight (good for the kids!), differ from carting harnesses in that they have a chest strap that distributes the weight forward and a girth strap that positions the harness on your dog. Be sure to look for measurement and fitting instructions, which will ask you for the weight and neck measurements of your dog. Many harnesses have sliders that can be secured for a comfortable (two fingers’ room) fit. In place of the rear girth, there’s a bar that should be placed under your dog’s tail to rest on his thighs. This piece attaches to the singletree of the wagon, which is a fancy term for a pivoting bar that gives the dog the flexibility to turn the cart without undue strain.
Carts and wagons
Not only does your dog need the harnesses and lines, but he also needs something to pull. Here’s how carts and wagons differ:
– Carts: Carts have two or three wheels and turn nicely. Carts are good for training and competition, coming in lightweight versions or heavier (up to 50-pound) competition styles.
– Wagons: Wagons have four wheels and distribute weight evenly so the dog won’t feel off balance, but they’re a bit awkward to turn. Wagons are good for county fairs and for heavy yardwork.
Tip
Before transforming that dusty old wagon in the garage into a two-wheeled carting machine, turn it around in a circle. Does one wheel stay under the bed while the other projects out? Not good. This forces the weight of the load onto one side, tossing everything (including your dog) off balance. When wagons turn, all four wheels must stay under the flat bed.
Warning!
If you’re planning kid rides or yard help, wagons are a must. A cart can’t balance the weight, and if it tips, you might scare your dog off carting for good.
Basic training: Putting the dog before the cart
The first step in training your dog for carting is familiarizing your dog with the harness. Once he accepts having it put on, he should wear it while you review his basic training from Chapter
Prepping for Training — Mentally and Physically on the following commands:
Your dog will have to learn some new commands too: “Left,” “Right,” “Fast,” “Slow,” and “Back.” Though it seems like a lot to teach your dog, the commands are just labels for regular actions like moving to the left and right. As you lead your dog during training, label each action with one clearly spoken command. Once you’ve spoken each command at least a dozen times, ask a helper to guide your dog on-leash as you stand behind him and direct him with these cues. Ask the helper to reward your dog for his recognition. Patient training yields great rewards.
Backing up
Teaching your dog to back up may sound easier than it is. Your dog isn’t used to moving backward. To teach him this move, just follow these steps:
1. Set up a 2-x-4-foot chute in your home.
Placing some chairs along a wall will do.
2. Have your dog stand in the chute, and command “Wait.”
3. Stand in the opening and face your dog. Hold a favorite treat at the side of his face and move slowly towards him as you say “Back.”
If he steps back with even one foot, congratulate him. If he sits, no dice. If you’re having trouble, check where you’re holding his treat: It must be at the side of his face. Above that point, he’ll sit. If all else fails, have a training partner gently hold his back end up as you encourage him backward. Once he gets the motion ask for more steps backward before offering the reward. After six successful responses, practice this outside the chute, one step back at a time.
Introducing the cart
When your dog has all the basic commands down, you can begin training him to get used to your rig. When first introducing the cart to your dog, you should explore it together. Wait until your dog is comfortable with his new toy before hitching him up.
1. Place empty traces (harness lines) on your dog and walk along in a straight line.
2. Attach a light weight to the traces.
Try a large paper bag stuffed with newspaper.
3. Have a training partner walk by the bag as you steady your dog forward.
If your dog is concerned, encourage him along and keep walking.
4. Attach a heavier item to the traces, such as a wooden plank.
To ensure that the weight is distributed evenly, secure two eyebolts and ropes to the wood plank. At this stage, you should be focusing your dog with treats, and your partner should be watching the plank to ensure that it doesn’t get caught.
Walking with the cart
A training partner will be an integral part of the process for a while, so don’t plan a session without him or her. Here’s how you and your training partner can introduce your dog to walking with the cart:
1. Place your dog in the harness. Have your partner hold the shafts of the cart and walk it into position next to your dog.
2. Let your dog sniff the rig and relax with it. At this stage, the cart will not be secured in the harness. Ask your helper to move the cart alongside your dog as you walk forward in a straight line.
3. Once your dog is steady, command him “Forward.”
Tip
If the cart disturbs your dog, and you’re unable to settle him down, return to attaching a light weight and work at it slowly. During practice, reinforce the steps that your dog is comfortable with before working with heavier weights.
4. Have your partner occasionally bump into your dog with the shafts while walking next to him.
Watch your dog’s reaction, keeping him moving along as if it’s no big deal. Continue to turn cart and dog separately.
5. Now you’re ready to secure the cart to the harness. Attach the cart to your dog by putting the shafts into the loops only.
6. Walk along while your partner steadies the shafts. You can now introduce the words “Pull” and “Halt.”
Don’t turn with the cart yet.
Working on starts, stops, and speed
Now you’re ready to connect the traces to the part of the harness called the singletree that secures the harness to the cart, ensuring that the shafts don’t slide up as your dog stops. Your helper should continue to hold the shafts to keep them steady until your dog is comfortable with the occasional interference.
1. Rig your dog and practice your stationary obedience commands: “Stand,” “Sit,” “Down,” and “Stay.”
2. Continue to work in a straight line as you command “Pull,” “Halt,” “Wait,” “Fast,” and “Slow.”
Tip
If you have a big dog, you may need a weighted cart to introduce commands such as “Fast,” “Slow,” and “Halt.” Remember, with carts, the weight must be evenly distributed. You can purchase weight bars made especially for this purpose.
Changing direction
To teach your dog turns, you should work in an open parking lot or cul de sac. Start with big left circles, saying “Left” as you herd your dog to the side and lure him with food. Do this until you’re sure your dog is having fun with it. Slowly work in smaller circles. Now do the same thing to the right.
The last thing your dog should learn before you take the show on the road is backing up. Of course, he must know what you’re talking about before you ask for it in a harness (see the earlier section “Backing up” for details). Calling your partner back to straighten the cart while your dog backs up is useful. It can also help to practice on an uphill slope, where gravity encourages your dog to back up. Soon it will be part of the show.
Once your dog is accustomed to the cart, you can acclimate him more quickly to a wagon, or just have fun with your cart.
Sledding
This section is for snow lovers only! The only thing I loved more than snow as a kid was my Husky dog, Shawbee. One of the greatest gifts I ever received was an official sled dog harness; finally, something we could really get into together!
In this section, I introduce you to a few forms of dog sledding, discuss equipment, and include a few tips on training. If your dog is big enough and strong enough to pull you, he has what it takes to start sledding.
Remember
Sledding is a complex activity requiring a fair bit of specialized equipment. Your dog can learn all about it from you, but you need to learn about it from someone else. A basic training course is a must for would-be mushers. To find out about courses in your area — as well as where to buy equipment and other tools of the trade — contact www.sleddogcentral.com, www.isdra.org, or www.blackicedogsledding.com.
Choosing the type of sledding
What’s the first thing you think of when someone says “dog sled”? I don’t know about you, but I think Iditarod, that grueling 1,150-mile Alaskan race from Anchorage to Nome. The human competitors spend their every waking moment breeding, caring for, and training their dogs, who are arctic athletes extraordinaire.
However, the Iditarod isn’t all there is. Here are some of the forms dog sledding can take:
– Recreation: Sledding may be just for fun. Dogs have a natural urge to pull kids around on a leash, so why not redirect this instinct? The sled makes it easier for the dog and more fun for the kid.
– Dog sled racing: Across the United States and in many other northern regions of the world, a huge variety of sledding events are sponsored each year. These competitions may be short or long, regulated for few dogs or many, lightweight or heavy, recreational or for serious contenders only. To get a listing of sledding events, plug “dog sledding events” plus your country’s name into your search engine and see where that takes you.
Tip
Any large dog can pull a sled, but your dog’s build will dictate the kind of pulling he most enjoys. Large-boned, lumbering breeds can pull heavier weights more slowly over longer distances; leggy breeds that are light on their feet can pull less, faster, over shorter distances. When you think of “sled dogs,” you may envision a whole team of dogs racing across a field of snow. In truth, though, there are smaller sleds meant for three- or two-dog teams, or even one dog.
Getting the sled and snow gear
First things first. You’ll need equipment: Check out
www.blackicedogsledding.comor www.alpineoutfitters.net. In this section, I introduce you to harnesses, sleds, lines, and cold-weather clothing for you and your dog.
Harnesses
Harnesses for dog sledding come in several versions: the X-back harness, the lightweight racing harness, and the weight and freight harnesses. The most popular everyday harness is the lightweight racer, made out of nylon and designed to distribute weight evenly across your dog’s back. If you’re serious about this activity, talk to an expert to determine what’s best for you.
Whatever harness you choose, it must fit properly, lying comfortably along your dog’s back with the attachment loop falling just above his tail. A poor fitting harness is a pain in your dog’s neck, literally — cutting into his fur and causing him to run sideways in an attempt to compensate.
Sleds
There are a few different types of sleds made for the hobbyist and competitors alike. Though you may use your garden-variety sled, these commercial sleds have two runners to stand on, a handlebar that rises from a flat bed where you can put parcels or people, and the all-handy brake to help slow your dog/team down as you bring them to a stop. Following are some choices of dog sleds:
– Lightweight sprint or kick sleds: These sleds are designed for racing short distances and for recreational sledding. Though they have a seat, you generally run or stand at the back of the sled and push the sled to maneuver tough spots. This is the type that my Husky Shawbee and I grew up with.
– Toboggan sleds: Use these versions for sprint sledding and long-distance events.
– Freight sleds: Tow the heavy stuff with these sleds.
Back when I was running my Husky, sleds came in one material — wood. Today’s market offers sleds in high-strength aluminum, plastic, and traditional wood. There are pluses and minuses to each material. Cost is a huge factor. The more ergonomically designed, the more expensive they are. The lightness of aluminum and plastic can also work against you if your dog starts to run. Use the Internet to research different types of sleds before you make a purchase. Two of my favorite sites are
mushing.com and
skidog.ca.
Gangline
What’s missing? You have the sled. You’ve fit a good harness. Now you need something to attach the two. The piece that attaches the dog to the sled is called a gangline.
Tugline
In multi-dog rigs, the tugline is the piece that connects the harness to the gangline and distributes the sled’s weight evenly for maximum comfort
Paw protection
What’s hot for the fashionable and safety-conscious sled dog? Booties! Attractive and secure, many mushers use them to protect their dogs’ feet. Although the thought of buying booties for your dog may seem silly, professional mushers wouldn’t go out without them. Ice and snow wreak havoc on a dog’s paws and can cause deep, painful cuts.
Tip
If you have a long-coated or wire-coated breed, you need to trim his fur (especially around his feet) so that snow doesn’t build up in his coat.
Outfitting yourself
The final thing you need to consider is your clothing. You can sweat profusely after running behind the sled for five minutes, even in subzero temperatures, but you must think smart and dress for all extremes. Here are a few tips:
– The fabric of hats and gloves should be lightweight and waterproof.
– If it’s windy, wear a facemask.
– Sunglasses are a must, even on a cloudy day.
Basic training for your sled dog
Start out on a regular leash, and progress to harness training — first just stand behind your dog and direct him, then attach a light weight to get him accustomed to pulling weight. Perfected that? You’re ready for the sled!
Teaching sledding commands
Teach your dog/puppy the commands he’ll hear out on the trail as soon as possible. “Hike” means hit it: Go forward and lean into it! Say “Gee” for right, “Haw” for left, “Easy” for slow down, and “Whoa” for stop. Say these commands over and over, and your dog will learn them in less than a month. Following are a few teaching tips and a few more commands:
– “Hike”: Take your dog into an open area and, when possible, position someone in front of you to call and bait your dog forward with his favorite toy or treats. This creates a sense of urgency and excitement for this command. Once your dog is catching onto this “Hike” game, shout it whenever you’re in the mood for a drag.
– “Gee”: This command tells your dog to turn right. Say it as you turn with him, over and over and over again.
– “Haw”: Same concept as “Gee,” but in the opposite direction. Shout “Haw” and hang a left turn.
– “Gee over”: Adding “over” to these directional cues softens the angle. “Gee over” directs your dog to shift to the right or to bear right at a fork. (In competition, you use this command to pass another sled on the right.)
– “Haw over”: This one tells your dog to move to the left, bear left at a fork, or pass another sled on the left.
– “On by”: This oh-so-important command teaches your dog to ignore distractions or to stay straight through a fork. First, review the “Nope” command from Chapter Encouraging Self-Control before You Launch into Lessons. Then set up distractions, such as favorite toys on the floor, and use “On by” as you direct your dog through without even a peek. (Is your dog still distracted? Say “Nope” firmly and correct him with a tug on the leash.)
– “Easy”: This command teaches your dog to slow it down — not stop completely, but shift down a gear or two. Teach it on-leash first, before expecting your dog to understand it once he’s rigged.
Tip
If your dog has trouble learning this cue, practice on a 6-foot leash initially and/or consider a head collar, which can be controlled by a secondary leash as you’re running together. This collar works like a horse halter and will slow your dog with the slightest pressure on it.
– “Whoa”: This one tells your dog to stop: Make sure he has it down pat before you harness him up. Each time you come to a stop on-leash, tell him “Whoa” and then “Sit.”
Adding weight
Once your dog has learned the commands, you can attach a tire or a 1- to 2-foot piece of 2-x-4-inch wood to his rig by screwing two eyebolts into the wood and tying the rope to secure it evenly to the harness. The first time you introduce him to pulling weight, you should have a training partner near the wood to make sure it doesn’t get stuck. Follow a format similar to that of the preceding section, keeping the lessons short and upbeat: Three to five minutes is a good starting point; then build the lesson time gradually as your dog’s focus sharpens.
Warning!
You may start these lessons with dogs older than 5 months, not before.
Introducing the sled
Tip
When you’re ready to begin training, head over to a clear field or a golf course so that your dog doesn’t get tangled up by all sorts of objects.
During your first outings, you should walk/run in front of your dog and customize him to hearing his new commands. Recruit a helper to stand behind and steady the sled.
1. Hitch your dog to the sled.
2. Leading your dog on a leash, stand at his head and shout “Hike” as you start forward.
“Hike” means go, so if he doesn’t respond, just keep going. He’ll catch on soon! Keep your dog on a long lead and stand at his head.
3. If your dog wants to run like wild, say “Easy” and keep him at a moderate pace.
If he turns to look at the sled, say “Ep, ep” gently as you continue forward.
4. After a few practice runs, start using “Gee over,” to guide the sled to the right. Once your dog starts leading you, practice “Haw over.” Then start intermixing the two, but not too often.
Only “Hike” should be repeated frequently. Telling your dog to turn every five seconds is impractical and annoying.
5. After a week of beginner practice, you can introduce your dog to pace changes, turns, and pulling in front.
For changes of pace, repeat “Hike” to encourage your dog to move faster, say “Easy” for slow down, and say “Whoa” to come to a stop.
You already know the commands for right and left. Practice turns in just one direction for a few days, then switch to the other.
Giving commands from behind your dog
By now your dog should be pretty psyched to pull his rig. To get him to pull solo, start your usual “Hike” at your dog’s side, then drop the lead and drift back, repeating “Hike.” If your dog worries, turning to keep sight of you, you may be going too fast. If he’s confident but confused, ask a friend to lead him forward until he gets used to hearing your commands from behind.
Practice your control commands by running four feet behind your dog; if he’s confused, go on up and help him out. If he makes the transition, praise him wildly, say “Whoa,” and give him a hug. Yes!
If your dog is rigged and a distraction causes pause, shout “On by!” and go to his head if you must. If your dog’s focus is an issue, review the “Nope” direction from Chapter
Encouraging Self-Control before You Launch into Lessons, saying both commands together ten times and then dropping “Nope” for the new terminology “On by.”
Progressively drift back until you’re able to command from behind the sled. If at any point your dog is confused, either slow up a step or have a friend lead your dog while you command him from behind.
Next, you’re ready to begin getting on the sled. When you first step on, it will add a lot of weight to the rig all of a sudden. Work on a downward slope (not a hill) and ask your helper to guide your dog/dogs as you ramp up your enthusiasm and shout familiar directions, like “Hike!” After 5 to 10 seconds of weight-pulling, jump off and push the sled as you continue to direct your dog/dogs.
As your dog/dogs get comfortable with pulling your weight, lengthen the time you remain on the sled as your dog/dogs pull it.
Remember
Sledding is a human sport too. Jump off and help push anytime you’re moving uphill, or to give your dogs guidance in moving or propelling over difficult terrain!
Joring: Pulling Skiers, Cyclists, Runners, and More
Are you a multi-athletic sort with a dog who hates being left behind? If your dog has any pulling instincts (and what dog doesn’t?) you’ll have more fun sharing your interests than you ever imagined. Love to cross-country ski? Bike? Run cross-country? Well, hold your huskies — each of these sports has a canine sister sport that you can actually do simultaneously. Let me introduce you to the world of everything joring.
No, it’s not as crazy as it sounds. In joring, you don’t just hold onto your dog’s collar and go for a ride. The dog wears a harness, and he pulls you by a line attached to a belt you’re wearing, a tow bar (think water-skiing), or even a bike or scooter. In this section, I introduce these pulling activities, discuss some equipment, and help you get started.
Warning!
Both you and your dog need to train and condition for joring hobbies. And yes, there is some danger involved — if you don’t take the training elements seriously, your dog could veer off to chase down a bunny. Ouch! But if you’re mindful and you train your dog properly to stay on-course and avoid distractions, what a ride!
Profiling a good joring dog
You don’t need a whole team of dogs for these activities — joring is for one to three dogs at a time.
Tip
Joring activities are open to any breed or mixed-breed dog over 30 pounds. The only prerequisites are a strong foundation in the basics and an intense passion for pulling. Of course, not every breed of dog is ideal for each activity — you probably wouldn’t want to send your unclipped Puli (with his corded coat) out in 6 feet of snow, but you could try out canicross or scootering in the dry seasons!
My favorite quote comes from Kim Tinker of Sandy, Oregon: “There are no bad dogs, just exercise-dependent dogs.” And there are few better activities to satisfy your dog than these!
Surveying the types of joring
Technical Stuff
This whole joring craze began earnestly in Norway as a dog-assisted way to travel on skis. There, severe winters precluded man’s finest machinery, and rugged, well-insulated dogs were truly man’s best bet as well as his friend.
Like every good idea, joring got more refined and spread like a ripple to all corners of the globe. Other joring activities likely began as a way to condition sledding and skijoring dogs off-season. Regardless of the weather, people everywhere are teaching their dogs the finer art of pulling as a way to both exercise and spend time together.
This section gives you a brief description of joring activities. For more information on each one or for clubs in your area, enter the name of the activity in a search engine or visit
dogplay.comor
joring.org. And check out some footage on YouTube — it’s exhilarating!
Skijoring
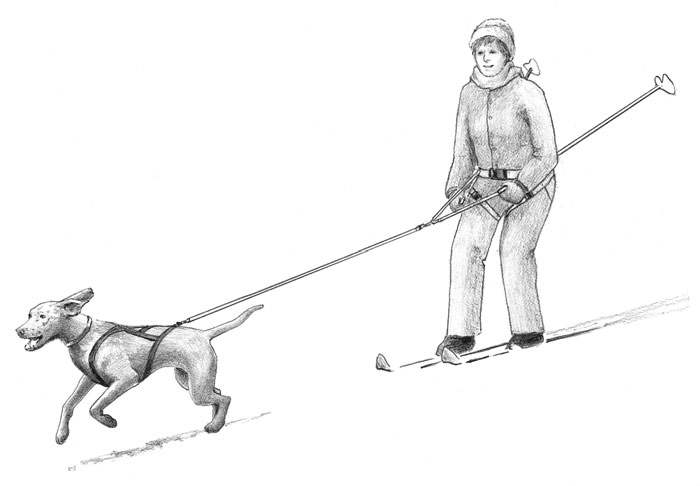
Skijoring is where all this joring business began. In skijoring, one to three harnessed dogs pull a person on cross-country skis (see Figure 19-1). Imagine dog sledding with the same equipment, a similar training approach, and fewer dogs (no more than three), but instead of pulling a sled, your dog is pulling you — on skis. Call it transportation and hold on tight!
Figure 19-1: Skijoring.
Technical Stuff
Skijor in Norwegian means “to plow snow with your face,” which is an all-toocommon sight when first rigging up with your dog to have him pull you on skis.
You can trail ski with your dog, backcountry it (go where few men tread), or enter competitions — sprint or distance races — comparing your time with others running the same course.
Here are some things to keep in mind as you explore skijoring with your dog:
– Stress your dog’s reaction to the “On by” command, especially if you’re joring solo. Distractions abound, and skis offer much less control than walking or sledding.
– Dogs need to be conditioned to distance running just as people do. While most dogs can handle running a mile or so, they have to exert much more effort to pull you as they go. When starting out, gradually increase your distance running from a mile to five miles over the course of two weeks. Once you’ve worked up to that distance, go out with your dog a minimum of once every three days to keep him fit.
– When laying out your clothes, remember that you exercise less when skijoring than when sledding or skiing solo. You also have a tendency to fall more frequently, which means getting wet. Dress warmly, and make sure your outer layers are waterproof. For more information about training your dog for skijoring, check out skijor.com and sleddogcentral.com.
Bikejoring
Bikejoring is dog-propelled biking. Envision it: Your dog running at top speed and you sailing along barely pedaling, watching the countryside whiz by. Okay, try not to envision the fall.
This sport is much more serious than dusting off your old bike, holding on, and hoping for the best. In this section, I include a few health and safety tips for this sport, which you can do with one or two dogs. If biking while exercising your dog sounds like a good idea to you, take it seriously. Research the idea extensively, and do what the experts say.
Looking out for your dog’s well-being
You need to keep your dog’s well-being in mind as you’re bikejoring, because dogs can’t talk and tell you if they’re hurt or thirsty. Here are a few tips on looking out for your dog:
– Dogs must be conditioned to run on pavement. If this is your only option, pay close attention to your dog’s pads after each run, speak to your veterinarian about joint care, and begin by slowly introducing the sport 1 to 2 miles at a time. When possible, find a dirt path or trail to ride on.
– Though you may be able to ride 50 miles in a day at 20 miles an hour, your dog cannot. An athletic dog’s top speed is about 12 miles per hour.
– Dogs get thirsty! When running your dog, go out at the coolest hours of the day and give him pauses to drink and/or eliminate.
Staying safe
Bikejoring is a serious sport and isn’t for the average hobbyist. Though anyone can get caught up in the fantasy of biking with your dog hauling you along, bikejoring requires mindfulness on many fronts: You have to adjust your balance and watch your dogs as you constantly gauge your speed.
Remember
Always wear protective gear when bikejoring with your dog. Helmets and gloves are a must. Dogs are not machines. Even a well-trained dog may get distracted, veer off-course, and leave you eating dust. If the prospect sounds too risky, consider scootering with your dog instead, which I explore in the next section.
Warning!
Watch your speed — especially when you’re going downhill! Always play it conservatively and gauge your dog’s speed. If your dog loses control, you will too!
One of the most frequent accidents occurs when the towline gets caught in the bike wheel. Just envision this, and then do everything you can to prevent it. Maintain your brakes so they’re responsive and quick. Purchase or make a pipe to suspend the towline above the front wheel. Towlines should never be held or tied to the handrails of your bicycle!
Invest in a top-of-the-line mountain bike, and keep it in top condition. The brakes are the most important thing — if you can’t stop, well . . . let’s just say it won’t be a pretty sight for either of you. Bikejoring demands a lot of braking: Is that a squeak you hear? It’s likely your brake pads are either wet, mud-coated, or wearing thin. A bike’s brakes are a bikejorer’s best friend; keep a close eye on yours and replace them when they wear thin. Also keep an eye on your suspension cables and the wheels’ alignment. Keep your bike in top working order!
Dog scootering
Bikejoring sound a little too scary? Consider dog-propelled, motorless scootering — the same dynamic with a life-sized scooter and a much easier and quicker dismount.
For dog scootering, think bikejoring with a large, durable scooter. Though it’s slightly more cumbersome than a mountain bike, it’s a lot safer. Your dog veers off-course? Just step off this one and you’re good to go. Though you can use any adult-sized scooter, scooters made especially for this sport are available. Commercial “dogscooters” are made of aluminum with top of the line brakes and shock absorbers, and can tolerate cross-country distance and the wear and tear of being pulled by one or two dogs.
For more information on everything scootering, visit www.dogscooter.com.
SkimjoringWhat will those Southern Californians think of next? Skimjoring involves dogs pulling a skimmer along the shoreline on a skim board. Dogs love making us happy, so if you can’t find the snow, just harness your dog up and head for the beach! |
Canicross
“What?” you ask. “There’s a sport that actually encourages your dog to pull you, while you’re running to keep up? Where can I sign up?”
Canicross is a little more complicated than that — but only a little. It’s a one person–one dog sport, likely initiated to keep skijoring dogs in shape during the off season. But like any good idea, it has become a craze. Canicrossers use their dogs for running, speed walking, and even hiking. Some people even use ski poles to keep their arms in shape. Sound fun to you? Read on. . . .
Remember
When training with your dog for this activity, remember it’s a human speed sport — even if you can cut a five-minute mile, you’ll still be on the slow side for your dog.
Here are some general things to keep in mind about canicross:
– Your dog must be in complete voice control if you plan to run with him. “Easy” is by far the biggest challenge. A well conditioned runner can run five-minute miles, but this is a trotting pace for a medium- to large-sized dog. The agility required to balance and run leaves little room for explosive tugging.
– Many canicrossers use a head collar to slow their dogs, discourage distractibility, and reinforce “Easy” on hills. This is especially recommended when dogs are new to this sport.
– If you’re a competitive runner, this sport will push your endurance. While you can find canicross competitions in Europe, it might be hard to locate one in the United States. Find races that allow leashed dogs — rig up, get focused, and leave your competitors in the dust!
Warning!
Don’t forget dogs wear fur coats! Your dog will overheat quickly in the heat. To prevent overheating, provide an ample supply of water and a quick swim or spray when possible to keep your dog cool and happy.
Equipment
Special equipment is required for joring sports. First, you must invest in a harness for your dog. For some sports, like skijoring and canicross, you’ll need a hands-free rigging for yourself too. Your dog should wear a lightweight pulling harness and comfortable
traces, which are the ropes you’ll hold that attach to your equipment. You can wear a human harness to free your hands once your dog is trustworthy on the trail. (Visit
www.blackicedogsledding.comfor a great overview of joring equipment.) Following are the basics:
– X-back harness: This harness is fitted to distribute your dog’s weight evenly and is designed to allow a fluid freedom of motion when he pulls you along. Different than a store-bought variety, this harness crisscrosses over your dog’s back and attaches close to his tail base.
– Hip belt: A hip belt allows hands-free maneuvering and a full range of movement for poling. Be sure you invest in a comfortable model — the best ones are 4 inches wide, adjustable, and come with a quick release mechanism just in case you need to break free from your dog in a hurry!
– Towbar: Holding onto a towbar is an alternative to the hipbelt. It’s a handle that fits securely into a nylon cover for comfortable holding and attaches to the towline.
– Towline: This is the line that attaches the dog to a hip belt or tow bar. Most towlines are made of a strong mountaineering rope (polyethylene rope) and range from 7 to 12 feet.
– Neckline: This attaches two dogs side by side.
– Line lead: This lead lines up two dogs front-to-back.
– Bridle: For bikejoring, this is one option for hitching the dog to the bicycle.
Warning!
When bikejoring, don’t tie the dog’s towline to the bicycle. The line must be completely centered if you want to remain upright!
Commands
While many of the commands for joring sports are identical to the sledding commands, the most important ones to stress are “Whoa,” “Easy,” and “On by.” Imagine a crisp day with a blue sky and a dog just champing at the bit to run. Everything is fine until — splat — you end up meeting the ground upclose and personal. “Whoa” would definitely be a help here. Or, say you’re passing by another joring team or some wildlife appears on the horizon — “On by” is absolutely essential to keep your dog on track. Heading downhill? Feeling like your dog just might propel you airborne? “Easy” reminds him to slow down. Review the training section of the sledding section and search out more detailed training manuals on the Internet.
Tip
Teaching a dog to avoid all distractions as he pulls you mercilessly along a snowy or dry dirt trail? “On by!” would be my highest priority! If your dog’s predatory impulses are still ripe, review “Nope” from Chapter Encouraging Self-Control before You Launch into Lessons (saying “Nope” with “On by,” until your dog learns the new command), and perfect this lesson before you hit the trail. Get professional help if you need it: Your safety should be your top priority.
Introducing training
The first time you introduce your dog to his rigging or the equipment you’re using, let him sniff it. Dogs see with their noses, not their eyes! Let your dog get a full visual before you ask him to pull it. If you’re using a bike or scooter, walk him around it, pretending you’re seeing this cool thing for the first time too.
Next walk him around as you push it. He may be nervous initially. Keep walking! Act nonchalant, and don’t cave to his edginess — if you act like it’s no big deal, your dog will mimic your mindset in time.
When initially directing your dog from behind, ask a training partner to lead your dog while you command from the rear. You should be on the equipment; your helper should not.
by Sarah Hodgson
